
The Essential Guide to Docker Containers
Though it has been around for some years now, Docker is still one of the most flexible, efficient, and nimble technologies for rapidly building environments to host software of all kinds—especially web-based applications.
Built on an older group of technologies collectively known as containers, it allows us—no matter what operating system we’re running—to create an environment that perfectly matches our application’s requirements, with little more than a text editor, a terminal, and a bit of time and resourcefulness.
This stands in stark contrast to the hours of effort that were often required in years gone by to build application infrastructure on bare-metal hardware, or the deep learning and time required to master the essentials of virtual machines, which were reduced with the inception of tools such as Salt, Ansible, Puppet, and Chef.
In this article, we’ll discover what Docker is, its core configuration file, and some of its key commands. You won’t become a Docker expert; however, by the time you’re finished reading, you’ll have created a basic environment that can run a simplistic PHP application and you’ll be familiar with the essential commands.
What You’re Going to Need
To follow along with this article, you’re going to need just a few things:
- Basic familiarity with the command line
- Your favorite text editor or IDE
- Git. Don’t worry! You only need to run one command
What Is Docker?
Docker was created by Solomon Hykes and was first released on March 20, 2013. It’s written in Go and runs on Linux, macOS, and Microsoft Windows (though it performs the best under Linux).
Without diving too deep into the internals, Docker is a way of standardizing how software is packaged, deployed, and updated. Docker deployments are composed of a series of one or more containers, where each container provides one service of the application, such as a language runtime, a database server, caching server, logging server, or anything else your application needs.
Building application infrastructure in this way makes it a lot easier to create the infrastructure composition that your application needs, to swap out one component for another as and when the time comes, and to scale any one or more of the components when there is sufficient demand.
From the description so far, Docker might sound similar to virtual machines (VMs) but there are some key differences. To quote Microsoft’s documentation:
Virtual machines include the application, the required libraries or binaries, and a full guest operating system. Containers include the application and all its dependencies. However, they share the OS kernel with other containers, running as isolated processes in user space on the host operating system.
This difference allows containers to be a lot more lightweight than virtual machines, as well as to have greater resource efficiency. In addition, given the simplicity of Docker configuration files, which we’ll see shortly, you’re often able to quickly become proficient at creating and maintaining them, and you can create configurations with a larger number of containers than you would when using virtual machines.
Two Key Terms You Need to Know
I’ve used two terms, seemingly interchangeably, so far: image and container. While these are related, they’re not interchangeable. So let’s quickly distill the difference between them.
Docker defines them as follows:
1. Images:
Images are the basis of containers. An image is an ordered collection of root filesystem changes and the corresponding execution parameters for use within a container runtime. An image typically contains a union of layered filesystems stacked on top of each other. An image does not have state and it never changes…
2. Containers:
Containers are a runtime instance of a Docker image. A Docker container consists of a Docker image, an execution environment, and a standard set of instructions.
Clone Application Repository
Now that you’ve had a rapid introduction to Docker, let’s build the container configuration to run the application. We’re not going to deploy an overly sophisticated application. Rather, we’re going to build a small Mezzio (PHP) application powered by Apache and mod_php within a single container.
The first thing you need to do is to clone the application that I created for this article and then switch to the new application directory. To do that, run the commands below.
git clone https://github.com/settermjd/mezzio-flat-structure hello-docker
cd hello-docker
In the application directory, create a new file named Dockerfile, and open it in your favorite text editor or IDE. With it open, paste the code below into it.
FROM php:8-apache
RUN a2enmod rewrite
ENV APACHE_DOCUMENT_ROOT /var/www/html/public
RUN sed -ri -e 's!/var/www/html!${APACHE_DOCUMENT_ROOT}!g' /etc/apache2/sites-available/*.conf
RUN sed -ri -e 's!/var/www/!${APACHE_DOCUMENT_ROOT}!g' /etc/apache2/apache2.conf /etc/apache2/conf-available/*.conf
COPY . /var/www/html/
Starting at the top, the FROM directive tells Docker which image to use as the basis for this image. It’s rather like inheritance in object-oriented software development. The example above uses an official PHP 8 image that integrates mod_php via the Apache web server.
Then, the RUN directive tells Docker to run the command a2enmod rewrite, which enables Apache’s mod_rewrite module. This is required so that any rewrite rules within the application’s configuration will be honored.
The ENV directive sets an environment variable, named APACHE_DOCUMENT_ROOT to /var/www/html/public/. Similar to software development, these simplify runtime configuration by setting environment variables rather than updating configuration files or copying them into the running container.
Next, the two RUN directives use sed to replace /var/www/html and /var/www/ in Apache’s configuration files in the image with {APACHE_DOCUMENT_ROOT} so that the value of that variable will be used to set the document root for the application.
Finally, the COPY directive copies all of the files in the current directory into /var/www/html within the image.
Build the Image
With the Dockerfile completed, it’s time to build the image using the Docker build command so that we can later run it. To do that, run the command below.
docker build .By passing only a period to the command, it tells Docker to look in the current directory for a Dockerfile (named Dockerfile) containing the build instructions. If found, Docker then pulls down the base image specified in Dockerfile (php:8-apache), if you don’t already have it locally available, and runs the remainder of the instructions, building our customized image.
Note: You could use the --file or -f options to specify a Dockerfile with a different name or in a different location.
You should see output similar to the example below in your terminal.
[+] Building 13.4s (11/11) FINISHED
=> [internal] load build definition from Dockerfile 0.0s
=> => transferring dockerfile: 361B 0.0s
=> [internal] load .dockerignore 0.0s
=> => transferring context: 2B 0.0s
=> [internal] load metadata for docker.io/library/php:8-apache 2.6s
=> [auth] library/php:pull token for registry-1.docker.io 0.0s
=> [1/5] FROM docker.io/library/php:8-apache@sha256:d81e878f14116534fff49b2a8b4c2cc8b91da8f87ae715ce816a81b7ac8943b2 8.0s
=> => resolve docker.io/library/php:8-apache@sha256:d81e878f14116534fff49b2a8b4c2cc8b91da8f87ae715ce816a81b7ac8943b2 0.0s
=> => sha256:5b26fc9ce030104e3ed1dc2b6231067d9eaa629b129a71c9bc21aed211beb9dd 18.68MB / 18.68MB 2.7s
=> => sha256:a940c8792357da01554c5d00f7c192038fb2ab9d312c03798b56cade6611825e 3.04kB / 3.04kB 0.0s
=> => sha256:97f22a92e1d12fb80c63646dccf6b9041089cc45aef28bd8d95c08ea94935f3f 12.91kB / 12.91kB 0.0s
=> => sha256:3492f4769444367000d2c12c6b1482630c1a6df69440fa64ee6d34e6ce93f2ae 474B / 474B 0.5s
=> => sha256:d81e878f14116534fff49b2a8b4c2cc8b91da8f87ae715ce816a81b7ac8943b2 1.86kB / 1.86kB 0.0s
=> => sha256:1dec05775a74fc3e3e317e71f6b606242142211e697a35c9dcfcef9ea4887113 512B / 512B 0.5s
=> => sha256:42f8680e74953f3872c4611f9a2a02f7e479670c88e6c2f44daeda47af1f1ec0 11.10MB / 11.10MB 3.5s
=> => sha256:ee90437efff6ec17c9fb5362f54d37ab6050f1287a11e5fe6a37a0afdb6e3f9f 493B / 493B 0.8s
=> => sha256:7e2f3c7e47f65d11867a97fa81429d390c9132fcdd5b2f4bd7d7c3666eede771 14.49MB / 14.49MB 4.6s
=> => sha256:d035d263eab5b3f10c48f3e173bfb442baba28cf807998e204d26b63ee231c3d 2.28kB / 2.28kB 3.0s
=> => sha256:8415ac7ce3a7a81c86ab203312be47fc0f40163cb96e54ec8d062412252b697d 244B / 244B 3.2s
=> => sha256:6b1d79ac9c762cd8bbb0517404dd9f42833884e9049dc1f13edf60cb5c130a10 891B / 891B 3.6s
=> => extracting sha256:5b26fc9ce030104e3ed1dc2b6231067d9eaa629b129a71c9bc21aed211beb9dd 2.2s
=> => extracting sha256:3492f4769444367000d2c12c6b1482630c1a6df69440fa64ee6d34e6ce93f2ae 0.0s
=> => extracting sha256:1dec05775a74fc3e3e317e71f6b606242142211e697a35c9dcfcef9ea4887113 0.0s
=> => extracting sha256:42f8680e74953f3872c4611f9a2a02f7e479670c88e6c2f44daeda47af1f1ec0 0.1s
=> => extracting sha256:ee90437efff6ec17c9fb5362f54d37ab6050f1287a11e5fe6a37a0afdb6e3f9f 0.0s
=> => extracting sha256:7e2f3c7e47f65d11867a97fa81429d390c9132fcdd5b2f4bd7d7c3666eede771 1.0s
=> => extracting sha256:d035d263eab5b3f10c48f3e173bfb442baba28cf807998e204d26b63ee231c3d 0.0s
=> => extracting sha256:8415ac7ce3a7a81c86ab203312be47fc0f40163cb96e54ec8d062412252b697d 0.0s
=> => extracting sha256:6b1d79ac9c762cd8bbb0517404dd9f42833884e9049dc1f13edf60cb5c130a10 0.0s
=> [internal] load build context 4.8s
=> => transferring context: 13.99MB 4.7s
=> [2/5] RUN a2enmod rewrite 0.4s
=> [3/5] RUN sed -ri -e 's!/var/www/html!${APACHE_DOCUMENT_ROOT}!g' /etc/apache2/sites-available/*.conf 0.3s
=> [4/5] RUN sed -ri -e 's!/var/www/!${APACHE_DOCUMENT_ROOT}!g' /etc/apache2/apache2.conf /etc/apache2/conf-available/*.conf 0.4s
=> [5/5] COPY . /var/www/html/ 0.9s
=> exporting to image 0.6s
=> => exporting layers 0.6s
=> => writing image sha256:f5fce113d7441b6a1485464435b97c579ec0070d5b42940891658dac2a8e9289
=> => naming to docker.io/library/hello-docker
Check That the Image Was Successfully Built
With the build process complete, let’s check that the image was built successfully. To do that, we’ll make use of the Docker images command, by running the command below.
docker images hello-dockerThis command will print out a list of all the Docker images available locally, filtered by the term hello-docker. You should see only one image in the list, as in the example below.
REPOSITORY TAG IMAGE ID CREATED SIZE
hello-docker latest f5fce113d744 3 minutes ago 431MB
Now that we know that the image was built successfully, it’s time to use it. To do that, we’ll use the Docker run command. Technically, this command runs a command in a new container, but in practice, that “command” will be running our application.
Docker run provides a plethora of options, of which we’re only going to see a few in this example. However, I strongly encourage you to check out the options in the official documentation, or by running docker help run in your terminal, and experimenting with some of them.
To start a container that uses our newly created image, run the command below.
docker run --rm --interactive –tty --detach --name hello-docker hello-dockerThis starts the container running in the background and gives it the name hello-docker. This is helpful for two reasons:
- Since it’s in the background we can run other commands, such as follow-up Docker commands.
- Since we assigned a name to the container, it’s easier to run other commands on it, such as Docker stop, which we’ll see shortly. If we didn’t do that, Docker would assign it a random name, which we’d have to first find, or we’d have to use the container ID that was printed to the console after the container started. Neither of these is ideal.
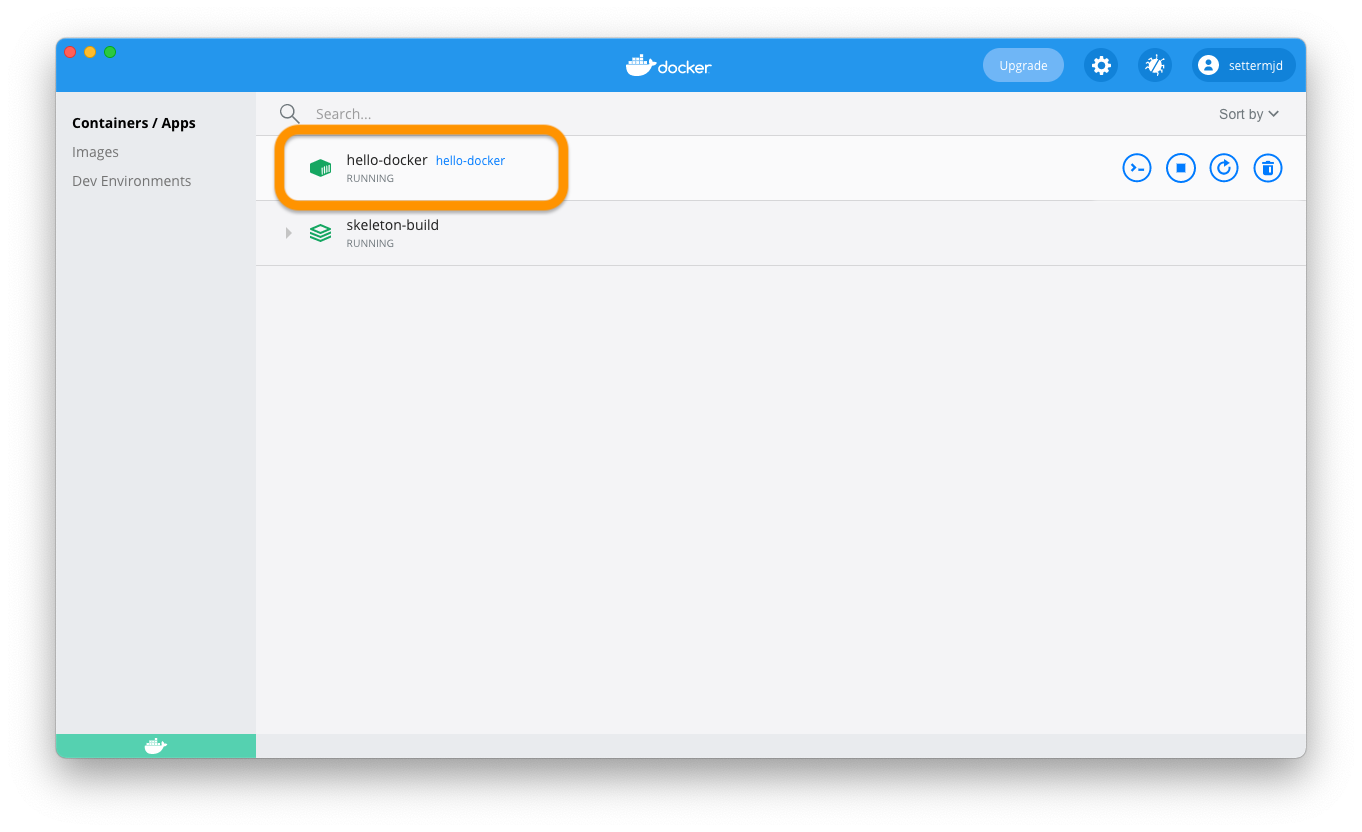
Check That the Container Is Running
There are a couple different ways we can check that the container’s running. If you’re using macOS or Windows, you can use the Docker Dashboard. You can see an example of it in the screenshot below. If you see RUNNING under the container’s name, then you know that it’s running.
Alternatively—especially if you’re using Linux—you can use the docker ps command. This command lists all of the running containers, similar to the Docker images command.
However, you’d then have to look through the NAMES list on the right-hand side to know if the hello-docker container was running. If you have a large number of containers, that could take a bit of time, and you might overlook it.
So instead, I recommend that you use the --filter option, to only print out containers matching specific criteria. In the example command below, the command prints a list of containers whose name is hello-docker.
docker ps --filter "name=hello-docker"If you run it, you will see output similar to the example below, printed to your terminal.
CONTAINER ID IMAGE COMMAND CREATED STATUS PORTS NAMES
661d62e5ba3c hello-docker "docker-php-entrypoi…" 6 minutes ago Up 6 minutes 80/tcp hello-docker
This shows that the container’s been running for the last six minutes, and that it’s attached to port 80 on our development machine.
Check That the Application Is Working
So, we know that the container is running. But is our application working as expected? There are two ways to determine that. Firstly, we can use the docker logs command to fetch the logs from our container and see if there are any error messages relating to starting Apache or PHP.
To do that, run the command below.
docker logs --follow hello-dockerYou should see output similar to the example below printed to your terminal.
AH00558: apache2: Could not reliably determine the server's fully qualified domain name, using 172.17.0.2. Set the 'ServerName' directive globally to suppress this message
AH00558: apache2: Could not reliably determine the server's fully qualified domain name, using 172.17.0.2. Set the 'ServerName' directive globally to suppress this message
[Mon May 31 11:30:51.333324 2021] [mpm_prefork:notice] [pid 1] AH00163: Apache/2.4.38 (Debian) PHP/8.0.6 configured -- resuming normal operations
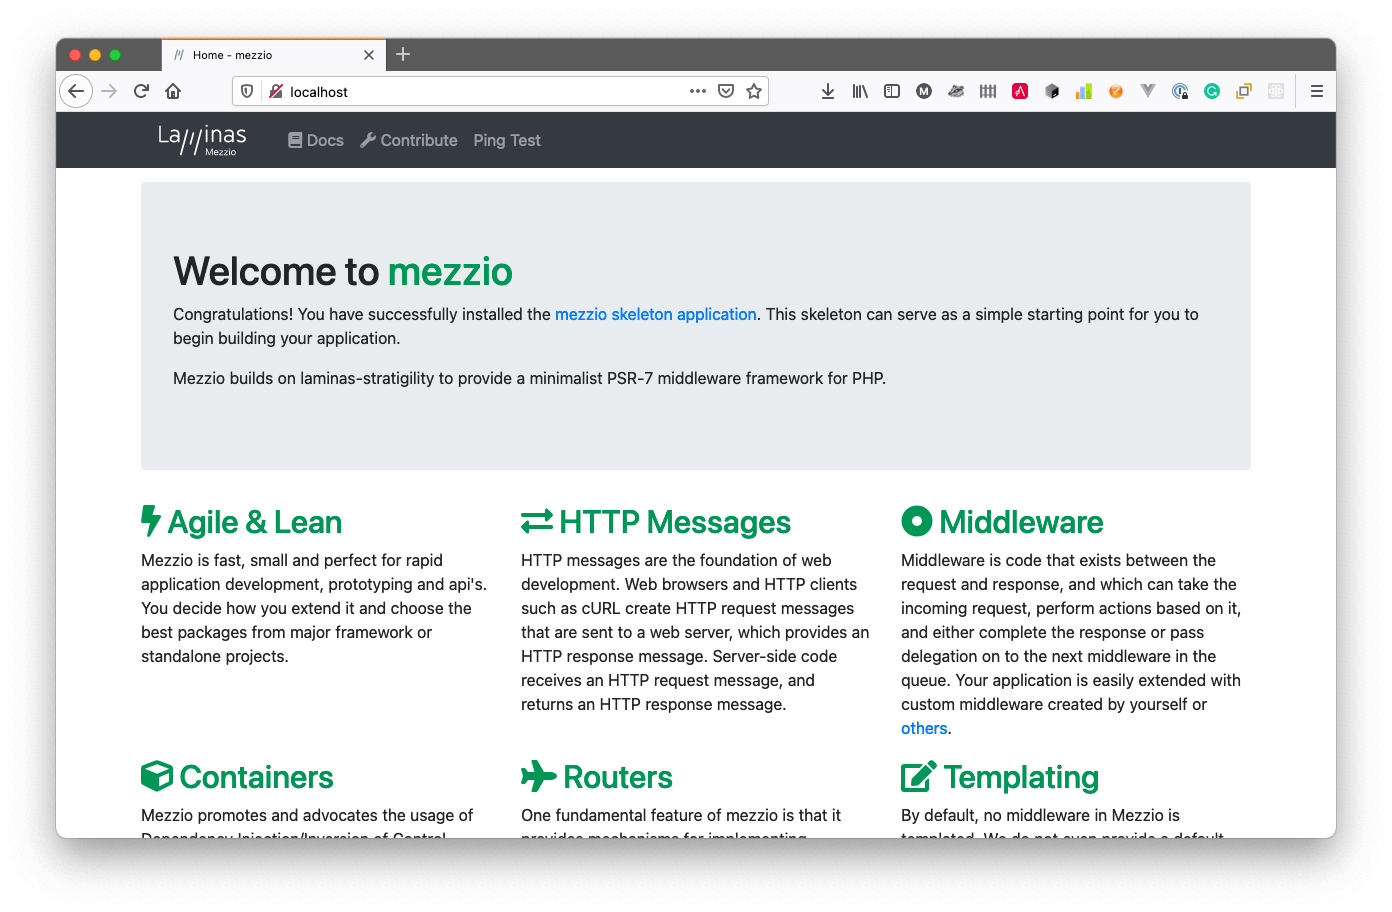
[Mon May 31 11:30:51.333464 2021] [core:notice] [pid 1] AH00094: Command line: 'apache2 -D FOREGROUND'Based on that, I’ll assume that the application is working. The second way to know, as you might expect, is to open the application in a browser such as Firefox. You should see the simplistic application rendered, as in the screenshot below.
Stop the Container and Remove the Image
Now that we know the application is working, it’s time to bring the tutorial to a close. To do that, we’re going to stop and remove the image using the Docker stop and rmi commands. To do that, run the two commands below.
docker stop hello-docker
docker rmi hello-docker
If successful, you should see the following output in your terminal.
hello-docker
Untagged: hello-docker:latest
Deleted: sha256:f5fce113d7441b6a1485464435b97c579ec0070d5b42940891658dac2a8e9289
In normal development, you’d likely not remove the image. Instead, you’d keep it and continue iterating on it as your application’s needs change. However, I thought that it might be helpful to show you the command all the same.
Conclusion
While you’ve learned a lot about Docker’s fundamentals and built your first Docker configuration to deploy a running application, there’s a lot more to learn such as tagging, pushing images to registries, using a collection of containers with Docker Compose, Docker security, and deployment options.
However, that’s too much to cover in one short tutorial. If you’re keen to keep on learning, here are a couple of resources that I strongly recommend you take advantage of. You won’t be disappointed!

It’s Really not that Complicated.
You can actually understand what’s going on inside your live applications.