The Complete Kubectl Cheat Sheet [PDF download]
Kubernetes is one of the most well-known open-source systems for automating and scaling containerized applications. Usually, you declare the state of the desired environment, and the system will work to keep that state stable. To make changes “on the fly,” you must engage with the Kubernetes API.
This is exactly where the Kubernetes command-line tool, Kubectl, comes in. Whether you’re new to kubectl and want to learn more, or you’ve been working with it for years, this cheat sheet is exactly what you need to start sending commands to your Kubernetes clusters. This article will cover all the essential Kubectl concepts and commands. We recommend you have the PDF cheat sheet version on hand when your application misbehaves and you need a quick reference guide to help you sort it out.
What is Kubectl?
Kubectl is the Kubernetes command-line tool. It allows developers to communicate with a Kubernetes cluster’s control pane. You can inspect and manage cluster resources, deploy applications, and view logs with it. Of course, to use the tool, you’ll need to install it first. You can install Kubectl on Mac, Linux, and Windows. It’s important to use a Kubectl version within one minor version difference from your cluster. The Kubernetes install tools docs have all the instructions you’ll need for your preferred work environment.

Kubectl commands list
Below is a list of all the relevant commands you can use in Kubectl, separated by function.
Kubectl objects
Kubernetes objects are persistent entities in the Kubernetes system. These entities are used to represent the state of your cluster. It can be considered a “record of intent”–once you create the object, the Kubernetes system will constantly work to ensure that object exists. By creating it, you’re effectively telling the Kubernetes system what your cluster’s desired state looks like.
Create multiple YAML objects from stdin
cat <<EOF | kubectl apply -f -
apiVersion: v1
kind: Pod
metadata:
 name: busybox-rest
Spec:
 Containers:
 - name: busybox
   image: busybox:1.28
   Args:
   - rest
   - "1000000"
—
apiVersion: v1
kind: Pod
Metadata:
 name: busybox-rest-less
Spec:
 Containers:
 - name: busybox
   image: busybox:1.28
   Args:
   - rest
   - "1000"
EOF  Create a secret with several keys
cat <<EOF | kubectl apply -f -
apiVersion: v1
kind: Secret
Metadata:
name: origsecret
type: Opaque
Data:
password: $(echo -n "f44lar7" | base64 -w0)
username: $(echo -n "john" | base64 -w0)
EOF
Resources
Kubectl allows you to create, update, patch, edit, scale, and delete resources. You can also use the interface to look for and view information about various resources. In this context, a resource is an endpoint in the Kubernetes API. If you aim to work with multiple resources, it might be easier to list them all in a new manifest file – a YAML or JSON file, and use kubectl as a bridge between your new manifest and the Kubernetes API.
Viewing and finding resources
List all services in the namespace
kubectl get services List all pods in all namespaces kubectl get pods --all-namespacesList all pods in the current namespace, with additional details
kubectl get pods -o wideList a particular deployment
kubectl get deployment dep-oneList all pods in the namespace
kubectl get podsGet a pod’s manifest YAML
kubectl get pod pod-one -o yamlDescribe pods/nodes with verbose output\
kubectl describe nodes my-node
kubectl describe pods my-pod
List services sorted by name
kubectl get services --sort-by=.metadata.nameList pods sorted by restart count
kubectl get pods --sort-by='.status.containerStatuses[0].restartCount'List PersistentVolumes sorted by capacity
kubectl get pv --sort-by=.spec.capacity.storageGet the version label of all pods with the label app=derollo
kubectl get pods --selector=app=derollo -o \ jsonpath='{.items[*].metadata.labels.version}'Retrieve the value of a key with dots, e.g. ‘ca.crt’
kubectl get configmap myconfig \
  -o jsonpath='{.data.ca\.crt}'
Retrieve a base64 encoded value with dashes instead of underscores
kubectl get secret my-secret --template='{{index .data "key-name-with-dashes"}}'Get all worker nodes (use a selector to exclude results that have a label named ‘node-role.kubernetes.io/control-sheet’)
kubectl get node --selector='!node-role.kubernetes.io/control-sheet'Get all running pods in the namespace
kubectl get pods --field-selector=status.phase=RunningGet ExternalIPs of all nodes
kubectl get nodes -o jsonpath='{.items[*].status.addresses[?(@.type=="ExternalIP")].address}'List Names of Pods that belong to Particular RC “jq” command useful for transformations that are too complex for jsonpath; it can be found at https://stedolan.github.io/jq/.
sel=${$(kubectl get rc my-rc --output=json | jq -j '.spec.selector | to_entries | .[] | "\(.key)=\(.value),"')%?}
echo $(kubectl get pods --selector=$sel --output=jsonpath={.items..metadata.name})
Show labels for all pods (or any other Kubernetes object that supports labeling)
kubectl get pods --show-labelsCheck which nodes are ready
JSONPATH='{range .items[*]}{@.metadata.name}:{range @.status.conditions[*]}{@.type}={@.status};{end}{end}' \
 && kubectl get nodes -o jsonpath="$JSONPATH" | grep "Ready=True"
Output decoded secrets without external tools
kubectl get secret my-secret -o go-template='{{range $k,$v := .data}}{{"### "}}{{$k}}{{"\n"}}{{$v|base64decode}}{{"\n\n"}}{{end}}'List all Secrets currently in use by a pod
kubectl get pods -o json | jq '.items[].spec.containers[].env[]?.valueFrom.secretKeyRef.name' | grep -v null | sort | uniqList all containerIDs of initContainer of all pods. It can be helpful when cleaning up stopped containers or avoiding removing initContainers.
kubectl get pods --all-namespaces -o jsonpath='{range .items[*].status.initContainerStatuses[*]}{.containerID}{"\n"}{end}' | cut -d/ -f3List Events sorted by timestamp
kubectl get events --sort-by=.metadata.creationTimestampCompares the current state of the cluster against the state that the cluster would be in if the manifest was applied.
kubectl diff -f ./my-manifest.yamlProduce a period-delimited tree of all keys returned for nodes. It can be helpful when locating a key within a complex nested JSON structure.
kubectl get nodes -o json | jq -c 'paths|join(".")'Produce a period-delimited tree of all keys returned for pods, etc.
kubectl get pods -o json | jq -c 'paths|join(".")'Produce ENV for all pods, assuming you have a default container for the pods, default namespace, and the `env` command is supported. It’s helpful when running any supported command across all pods, not just `env`
for pod in $(kubectl get po --output=jsonpath={.items..metadata.name}); do echo $pod && kubectl exec -it $pod -- env; doneGet a deployment’s status subresource
kubectl get deployment nginx-deployment --subresource=statusCreating resources
Create from a single file:
kubectl apply -f ./my-manifest.yamlCreate from multiple files:
kubectl apply -f ./my1.yaml -f ./my2.yamlCreate resources in all manifest files in dir:
kubectl apply -f ./dirCreate resources from url:
kubectl apply -f https://git.io/vPieoUpdating resources:
Roll the update “abc” containers of “frontend” deployment, updating the image:
kubectl set image deployment/frontend abc=image:v2Rollback to the previous deployment:
kubectl rollout undo deployment/frontendRollback to a specific revision:
kubectl rollout undo deployment/frontend --to-revision=3 Watch the rolling update status of “backend” deployment until completion:
kubectl rollout status -w deployment/backend Rollout and restart of the “backend” deployment:
kubectl rollout restart deployment/frontendForce replace, delete, and then re-create the resource. Note that this command may cause a service outage.
kubectl replace --force -f ./pod.jsonCreate a service for a replicated nginx, which serves on port 80 and connects to the containers on port 3100:
kubectl expose rc nginx --port=80 --target-port=3100Update a single-container pod’s image version (tag) to v5:
kubectl get pod mypod -o yaml | sed 's/\(image: myimage\):.*$/\1:v5/' | kubectl replace -f -Add a label (‘timely’) to the pod my-pod:
kubectl label pods my-pod new-label=timelyAdd an annotation to the pod my-pod:
kubectl annotate pods my-pod icon-url=http://goo.g3/XCMGhAutoscale a deployment named “ipsum:”
kubectl autoscale deployment ipsumn --min=2 --max=10Patching resources
Partially update a node:
kubectl patch node k8s-node-1 -p '{"spec":{"unschedulable":true}}'Update a container’s image. You are required to use the spec.containers.name since it’s a merge key:
kubectl patch pod valid-pod -p '{"spec":{"containers":[{"name":"kubernetes-serve-hostname","image":"new image"}]}}'Update a container’s image using a JSON patch with arrays:
kubectl patch pod valid-pod --type='json' -p='[{"op": "replace", "path": "/spec/containers/0/image", "value":"new image"}]'Deploy ludicrousPatch using a JSON patch with positional arrays:
kubectl patch deployment valid-deployment --type json -p='[{"op": "remove", "path": "/spec/template/spec/containers/0/ludicrousPatch"}]'Adda new element to a positional array:
kubectl patch sa default --type='json' -p='[{"op": "add", "path": "/secrets/1", "value": {"name": "whatever" } }]'Editing resources
Edit the service named “service-registry:”
kubectl edit svc/service-registryUse an alternative editor:
KUBE_EDITOR="nano" kubectl edit svc/service-registryScaling resources
Scale replica set named ‘ipsum’ to 3:
kubectl scale --replicas=3 rs/ipsumScale a resource specified in “ipsum.yaml” to 3:
kubectl scale --replicas=3 -f ipsum.yamlScale mysql to 5 (when the deployment named mysql’s current size is 2):
kubectl scale --current-replicas=2 --replicas=5 deployment/mysqlScale multiple replication controllers:
kubectl scale --replicas=5 rc/ipsum rc/lor rc/bacDeleting resources
Delete a pod using the type and name specified in delpod.json:
kubectl delete -f ./delpod.json Delete a pod immediately:
kubectl delete pod unwanted -nowDelete pods and services with the same names “bak” and “far:”
kubectl delete pod, service bak for Delete pods and services with label name=delLabel:
kubectl delete pods, services -l name=delLabelDelete all pods and services in namespace ns-del:
kubectl -n ns-del delete pod, svc --all Delete all pods matching the awk pattern3 or pattern5:
kubectl get pods -n mynamespace --no-headers=true | awk '/pattern3|pattern5/{print $1}' | xargs kubectl delete -n mynamespace podKubectl get is probably the most helpful command in collecting information. It allows you to retrieve information about all Kubernetes objects and nodes in the Kubernetes data plane. The most common objects you are likely to query are pods, services, deployments, stateful sets, and secrets.
The get command offers a range of possible output formats:
-o wide is like verbose; that is, it adds more information, which is dependent on the type of objects being queried.
-o yaml and -o json output the complete current state of the object and likely include more information than the original manifest files.
-o jsonpath allows you to select the information you want from the full JSON of the -o json option using the jsonpath notation.
-o go-template allows you to apply Go templates for more advanced features. Feel free to skip this one if you’re not fluent in Golang.
Here are some examples:
List all pods in the default namespace:
kubectl get podGet more information about a given pod:
kubectl -n mynamespace get po mypod-0 -o wideGet the full state in YAML of a given pod:
kubectl -n mynamespace get pods/mypod -o yamlGet the services in the default namespace:
kubectl get svcGet the value of a secret:
kubectl -n mynamespace get secrets MYSECRET \
    -o 'jsonpath={.data.DB_PASSWORD}' | base64 -d
Get the logs from a container:
kubectl logs mypod-0 -c myappDisplay endpoint information about the master and services in the cluster:
kubectl cluster-infoDisplay the Kubernetes version running on the client and server:
kubectl versionView the cluster configuration:
kubectl config viewList available API resources:
kubectl api-resourcesList everything for all namespaces:
kubectl get all --all-namespacesDaemonSet
A DaemonSet ensures that Nodes run a copy of a Pod. As nodes are added to the cluster, Pods are added to them. Deleting a DaemonSet will clean up the Pods it created.
Some typical uses of a DaemonSet are:
- Cluster storage daemon that can be run on every node
- Logs collection daemon that can be run on every node
- Node monitoring daemon that can be run on every node
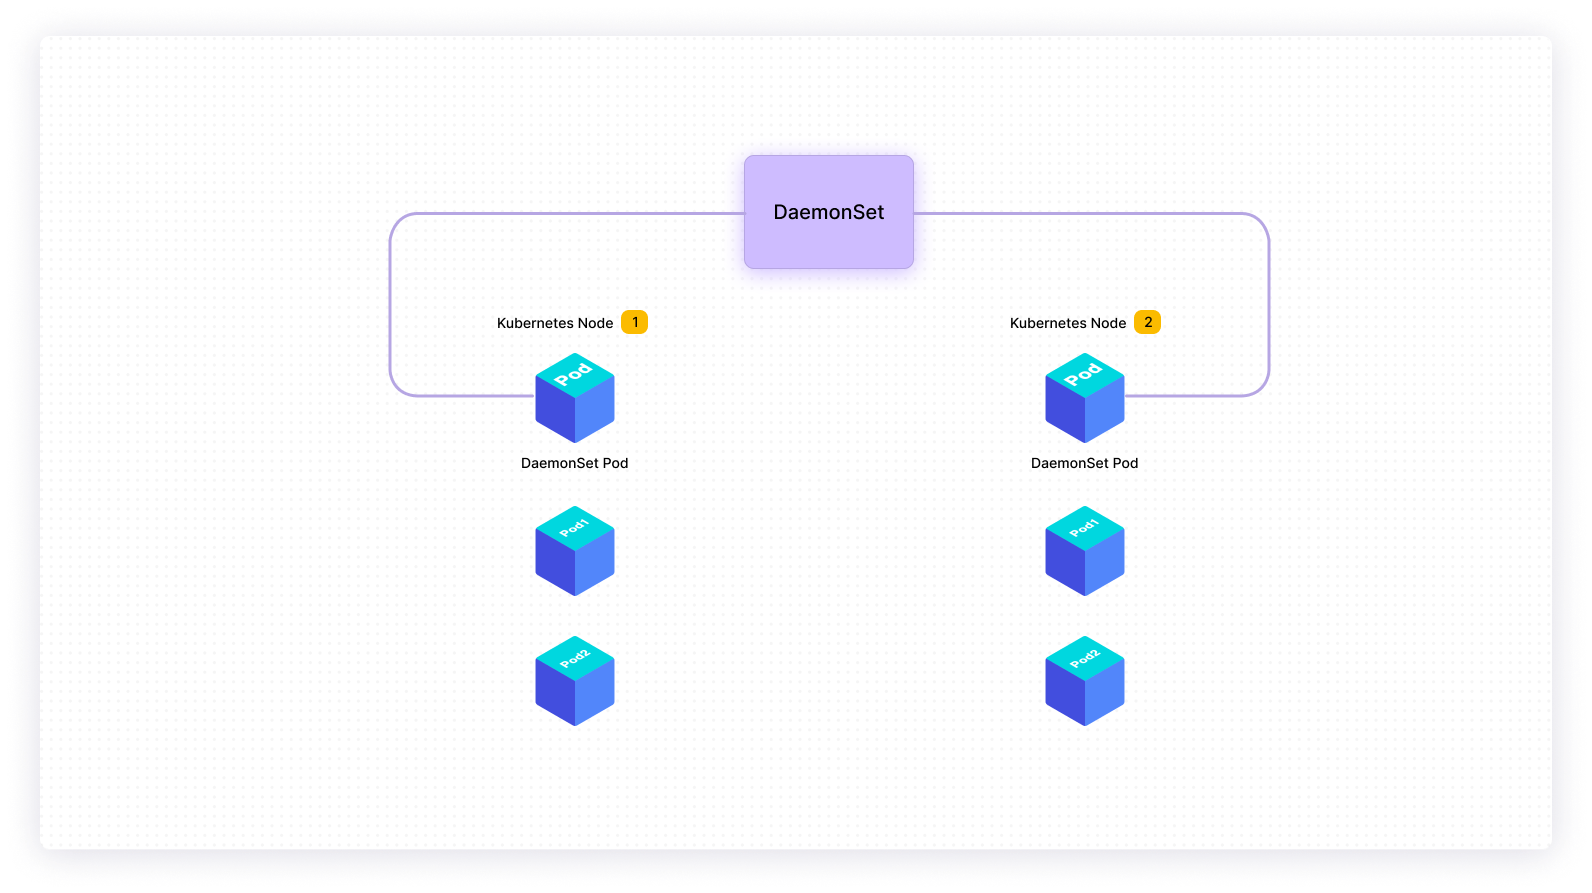
You can use a single DaemonSet to cover all use cases for all nodes or multiple sets, one for each type of daemon with different optional flags and different memory and cpu requests.
You can use shortcode ds to denote a DaemonSet
Shortcode = ds
List one or more daemonSets:
kubectl get daemonsetEdit and update the definition of one or more daemonSet:
kubectl edit daemonset <daemonset_name>Delete a daemonSet
kubectl delete daemonset <daemonset_name>Create a new daemonSet
kubectl create daemonset <daemonset_name>Manage the rollout of a daemonSet
kubectl rollout daemonsetDisplay the detailed state of daemonSets within a namespace
kubectl describe ds <daemonset_name> -n <namespace_name>Deployments
A deployment runs multiple copies of your application and automatically replaces any failed or unresponsive instances. The Kubernetes Deployment Controller manages deployments. The controller ensures that user requests are served through one or more instances of your application.
You can use shortcode deploy to denote deployment
Shortcode = deploy
List one or more deployments
kubectl get deploymentDisplay the detailed state of one or more deployments
kubectl describe deployment <deployment_name>Edit and update the definition of one or more deployments on the server
kubectl edit deployment <deployment_name>Create a new deployment
kubectl create deployment <deployment_name>Delete deployments
kubectl delete deployment <deployment_name>See the rollout status of a deployment
kubectl rollout status deployment <deployment_name>Namespaces
In Kubernetes, namespaces enable exact selection for groups of resources within a single cluster. Resource names must be unique within a single namespace but not across multiple namespaces. Namespace-based scoping is applicable only for namespaced objects (e.g., Deployments, Services, etc.) and not for cluster-wide objects (e.g., StorageClass, Nodes, PersistentVolumes, etc.).
You can use shortcode ns to denote namespace
Shortcode = ns
Create a namespace:
kubectl create namespace <namespace_name>List one or more namespaces:
kubectl get namespace <namespace_name>Display the detailed state of one or more namespace:
kubectl describe namespace <namespace_name>Delete a namespace:
kubectl delete namespace <namespace_name>Edit and update a namespace definition:
kubectl edit namespace <namespace_name>Display all the resources used by a namespace:
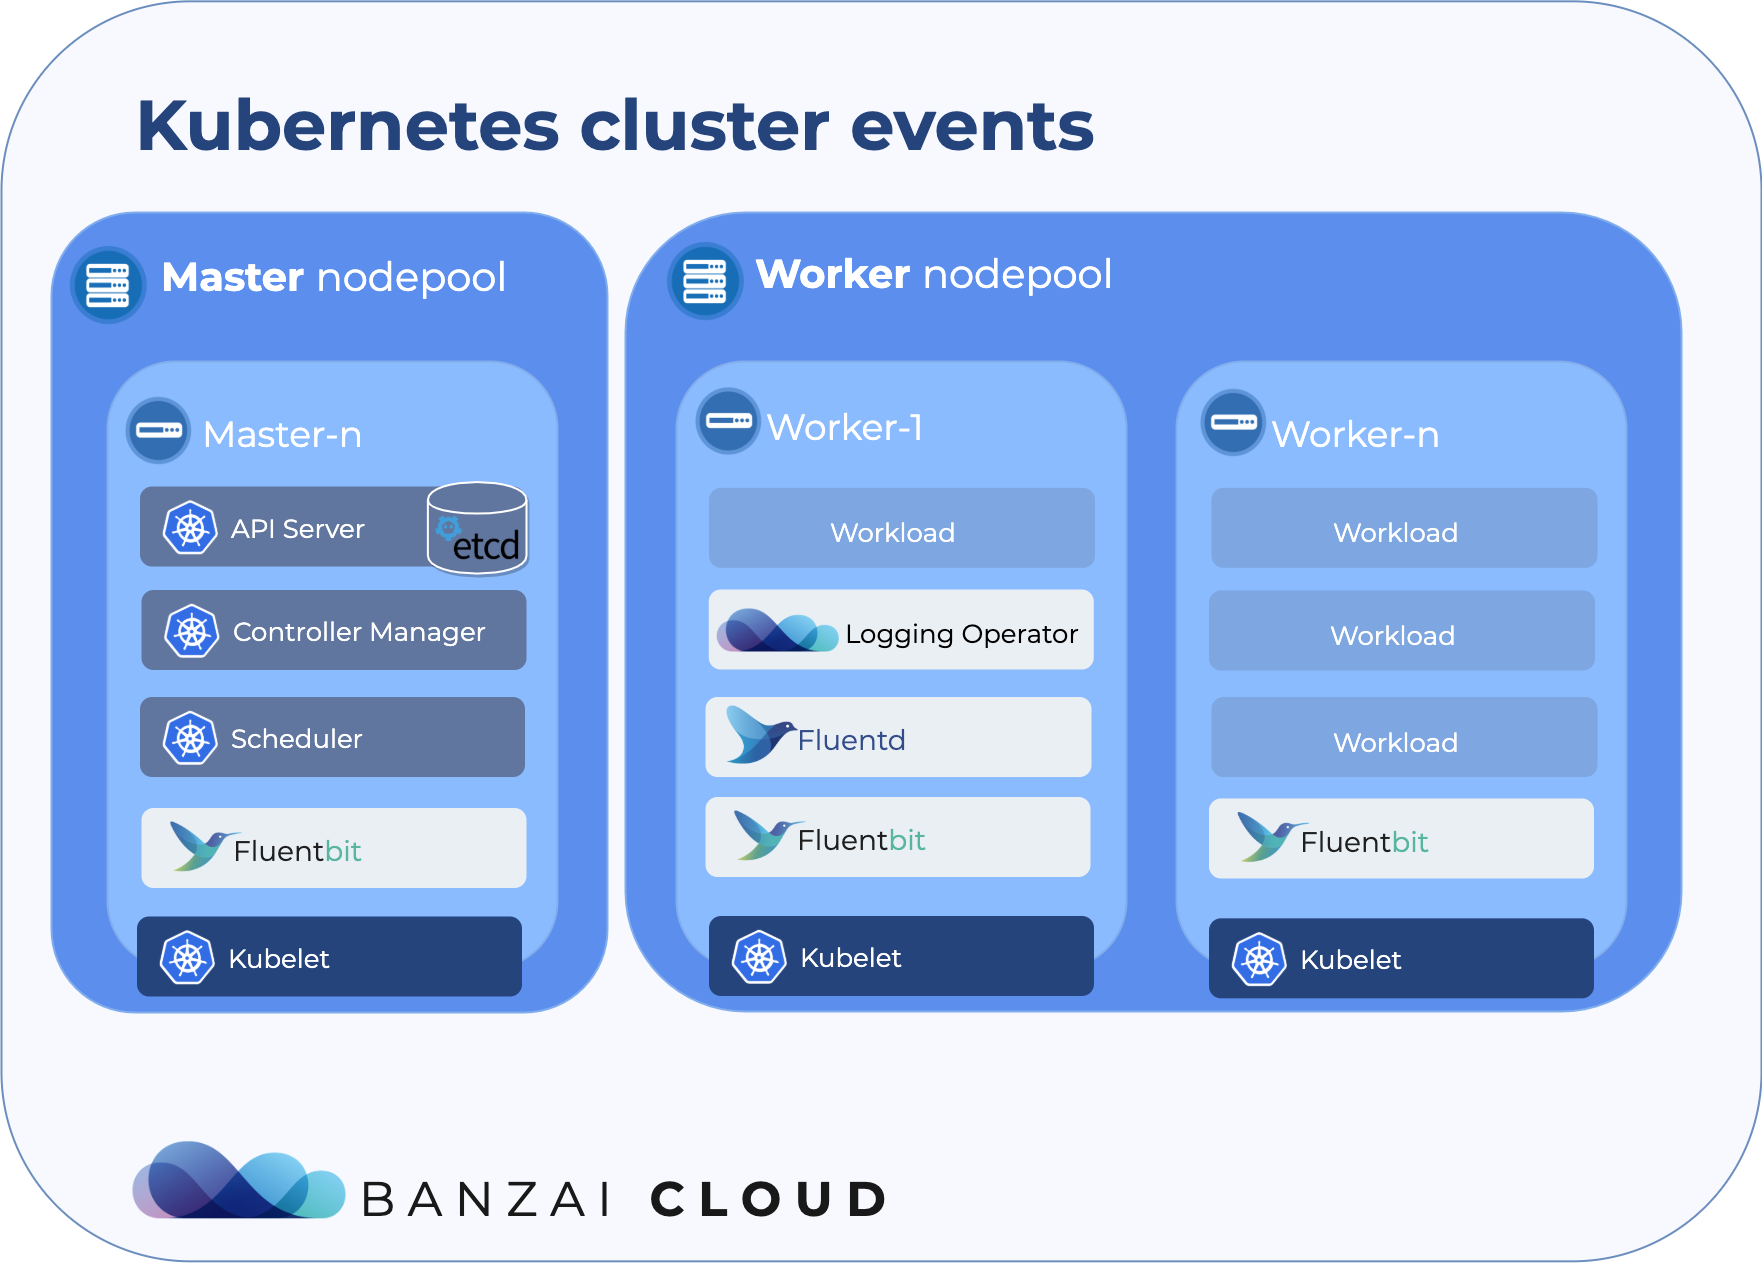
kubectl top namespace <namespace_name>Events
A Kubernetes event is an object in the framework generated automatically in response to changes in other resources—like nodes, pods, or containers.
Kubernetes events can help you understand how Kubernetes resource decisions are made and so can be helpful in debugging. You can think of events like the breadcrumbs of Kubernetes.
You can use shortcode ev to denote events.
Shortcode = ev
List all recent events for all system resources:
kubectl get eventsList all events of type warning only:
kubectl get events --field-selector type=WarningList all events (excluding Pod events):
kubectl get events --field-selector involvedObject.kind!=PodPull all events for a single node with a specific name:
kubectl get events --field-selector involvedObject.kind=Node, involvedObject.name=<node_name>Filter out normal events from a list of events:
kubectl get events --field-selector type!=NormalLogs
System component logs record events in a cluster, which is helpful for debugging. Since logs are constantly updated, this will only display the latest logs. In a production environment, it’s recommended to use a log aggregator and do your searches and filtering through it.
There can be two types of logs, fine-grained (more details) and coarse-grained (fewer details). Coarse-grained logs represent errors within a component, while fine-grained logs represent step-by-step traces of events.
Print logs for a specific pod:
kubectl logs <pod_name>Print the logs for the last hour for a pod:
kubectl logs --since=1h <pod_name>Retrieve the most recent 20 lines of logs:
kubectl logs --tail=20 <pod_name>Retrieve the logs from a service. Optionally you can select which container:
kubectl logs -f <service_name> [-c <$container>]Print the logs for a pod:
kubectl logs -f <pod_name>Print the logs for a container in a pod:
kubectl logs -c <container_name> <pod_name>Get the output of the logs for a pod into a file named ‘pod.log:’
kubectl logs <pod_name> pod.logCheck the logs for a previously failed pod
kubectl logs --previous <pod_name>ReplicaSets
RepliceSets ensure you have a stable set of replica pods operating as you have defined in the deployment file. You might use a ReplicaSet to confirm that identical pods are available.
You can use shortcode rs to denote ReplicaSets.
Shortcode = rs
List all the ReplicaSets:
kubectl get replicasetsShow the detailed state of one or more ReplicaSets:
kubectl describe replicasets <replicaset_name>Scale a ReplicaSet to x replicas instead of the current amount:
kubectl scale --replicas=[x]Secrets
A secret is an object containing some sensitive data like as a password, a token, or a key. This information is stored in a Pod specification or container image. Using a Secret prevents you from including confidential or sensitive information in your application code.
Create a new Secret:
kubectl create secretList all Secrets:
kubectl get secretsList all the required details about Secrets:
kubectl describe secretsDelete a Secret:
kubectl delete secret <secret_name>Helm
Helm is a Kubernetes deployment tool for automating the creation, packaging, configuration, and deployment of applications and services to Kubernetes clusters. All the following commands assume a Helm-deployed application.
Get details about the current release:
helm listGet details about the release in all namespaces:
helm list --all-namespacesGet details about the release in a specific namespace:
helm list --namespace jenkinsGet the values used in a specific application:
helm get values jenkins -n jenkinsGet all the information used in a specific application:
helm get all jenkins -n jenkinsServices
Services are an abstract way to expose an application running on a set of Pods as a network service.
Kubernetes assigns each pod with a unique IP address, and a single DNS can manage all the load across multiple pods. This allows you to treat the various pods as a sort of cloud-based black box containing the desired service.
You can use shortcode svc to denote Services.
Shortcode = svc
List one or more services:
kubectl get servicesShow the detailed state of all services:
kubectl describe servicesExpose a replication controller, service, deployment, or pod as a new Kubernetes service:
kubectl expose deployment [deployment_name]Edit and update the definition of one or more services:
kubectl edit servicesStatefulSet
StatefulSets represent a set of pods with unique, persistent identities and stable hostnames that GKE (Google Kubernetes Engine) maintains regardless of where they are scheduled. You can think of them like site URLs – they’ll (almost) always be there when you come to visit. The persistent disk storage associated with the StatefulSet is responsible for storing state information and other resilient data for the given StatefulSet pod.
You can use shortcode sts to denote StatefulSet.
Shortcode = sts
List a StatefulSet:
kubectl get statefulsetDelete StatefulSet only (not pods):
kubectl delete statefulset/[stateful_set_name] --cascade=false
In a nutshell
We’ve covered all the important actions you can take using Kubectl, including how to check your pods and clusters, create new objects, handle resources, and gather and display information. You can visit and revisit this cheat sheet whenever you need a little help.
Managing your app and ensuring it runs smoothly can be time-consuming, especially if you don’t use an observability platform. Lightrun enables you to add logs, metrics, and traces to your app in real time while the app is running. Spend your time coding, not debugging. Request a demo to see how Lightrun works.

It’s Really not that Complicated.
You can actually understand what’s going on inside your live applications.