
Using the Redis Command-Line Correctly
Redis is an open-source in-memory data store. You can use Redis as a database, message broker, or cache. It also supports Lua script evaluation so you can build automation scripts or custom operations on top of your key-value Redis store.
Typically, developers use language-specific client libraries when building apps with Redis. These clients abstract Redis’ command-line interface (CLI), making it easier to work with but more work to set up. Client libraries are great when you’re already using Redis in a project but not as useful for trying things out or debugging a production data store. For that, the Redis CLI is your best bet.
The Redis CLI is a great choice for prototyping before implementation, troubleshooting, and experimentation because it’s faster to get started with and more flexible. It provides tab completion, a history of your commands, and all the functionality you need to read, write, update, delete, or debug data in Redis.
In this article, you’ll learn everything you need to know about using the Redis command-line correctly:
- How to use the CLI to connect to a Redis server
- How to add and manipulate data
- Run Lua scripts
- Perform debugging operations
Along the way, I’ll offer some context to help you understand when you might use each of these features.
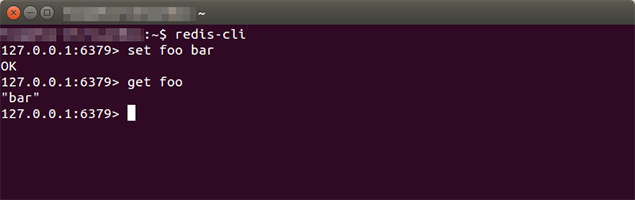
Connecting to Redis
Before you start using the Redis command-line, make sure you have it installed. You can find installation instructions here, and once complete, you can check if your installation was successful by running:
$ redis-cli --help
redis-cli 6.2.3

Usage: redis-cli [OPTIONS] [cmd [arg [arg ...]]]
...
Redis connects to a server at 127.0.0.1 on port 6379 by default. You can change the hostname using the -h flag and the port using the -p flag. To connect to a Redis server at example.com:3001, run the following:
$ redis-cli -h example.com -p 3001
example.com:3001>
If a password and username have been set for the server, you can provide them with the -u flag for username and -a for password. Using these flags is not recommended as anyone who retrieves your bash history will be able to see your password, so it’s usually better to use the AUTH command in interactive mode.
$ redis-cli
AUTH <username> <password>
You can also set the password using the REDISCLI_AUTH environment variable.
Selecting a Redis Database
A Redis server has 16 databases by default. The databases are zero-indexed, with the first database being 0. You can check the actual number by running redis-cli config get databases.
In interactive mode, the database number is displayed in the prompt within square braces. For example, 127.0.0.1:6379[13] shows that the 13th database is in use.
To select a database when connecting, pass its database number with the -n flag:
$ redis-cli -n 1
127.0.0.1:6379[1]>
If you’d like to combine all of the above commands, use the -u flag to specify a complete server URI:
$ redis-cli -u redis://<username>:<password>@<host>:<port>/<database-number>
$ redis-cli -u redis://<password>@<host>:<port>/<database-number>
$ redis-cli -u redis://<host>:<port>/<database-number>
CRUD Operations Using the Redis Command-Line
The commands used for CRUD operations differ depending on the type of data being handled, but first, you have to understand a bit about how Redis stores this data.
Redis keys are distinct identifiers associated with a value. They are used to perform operations on values (deletes, reads, and updates, for example). The values we will look at include strings, lists, sets, sorted sets, and hashes:
- Keys and string values can take on the form of numbers, characters, or files.
- A list is a string collection sorted by the order the elements were inserted.
- A set is an unsorted list where elements must be unique.
- A sorted set is just a set where each element is assigned a score, and the set is sorted by score.
- Hashes are maps containing field-value string pairs.
Redis also supports streams, hyperloglogs, and bit arrays, which you can read more about in the documentation.
Adding Data to Redis
Keys with string values are created with the SET command.
$ redis-cli set cat-count 10 OKTo create a key with a list value and add elements to it, use either RPUSH or LPUSH commands. LPUSH adds elements to the beginning of a list, and RPUSH adds them to the end.
$ redis-cli rpush cat-breeds persian ragdoll bengal
(integer) 3
$ redis-cli lpush hairless-cats sphynx
(integer) 1
SADD (short for “set-add”) will create a key with a set value and add members to it.
$ redis-cli sadd cities london zurich berlin
(integer) 3
For keys with sorted set values, use the ZADD command.
$ redis-cli zadd fruits 52 apple 47 orange
(integer) 2
HSET and HMSET create keys with hash values and add fields to them. HMSET sets multiple hash fields while HSET sets just one at a time.
$ redis-cli hset cat1 breed norwegian
(integer) 1
$ redis-cli hmset cat2 breed bobtail coat long
OK
Updating Data Using the Redis CLI
Updating string values in a Redis store can be done using one of several commands:
- The
SETcommand can update an existing key with a string value APPENDappends a valueDECRdecrements a valueGETSETsets a new value and returns the old valueINCRincrements a valueSETNXsets a value if it exists
Other update commands for keys with string values can be found using the help @string command in Redis’s interactive mode.
There are also several commands for updating a list value:
LPUSHandRPUSH(which I mentioned above) can be used to add new values to a listRPUSHXappends an element to the end of a list if the key existsLPUSHXadds an element to the beginning of a list if the key existsLINSERTinserts a new element between existing elements in a list
Similarly, you can use help @list in interactive mode to see all the Redis commands that can manage list values.
Adding and updating data manually in Redis is useful when you want to replicate production conditions in a test environment. For example, if you have a specific list that is causing errors in production, you could add it to your local environment and trace the error through your code.
Reading Data from Redis
Reading data from Redis is a good way to figure out if specific values are causing application errors. To retrieve a key with a string value, use the GET command.
$ redis-cli get cat-count
"10"
If a value does not exist for this key,GETreplies with anilvalue.
Since GET only works with string values, you need the LRANGE command to get list values.
$ redis-cli lrange cat-breeds 0 -1
1) "persian"
2) "ragdoll"
3) "bengal"
“0” in the example above specifies the start index of the list and “-1” the end. This command can also be helpful when attempting to fetch a subset of elements from a large list.
The SMEMBERS command will fetch all the members in a set, and the ZRANGE command returns members between a start and end index in a sorted set.
$ redis-cli zrange fruits 0 -1
1) "orange"
2) "apple"
Finally, HGETALL, HGET, and HMGET will retrieve hash values. HGETALL will return all the field-value pairs in a hash if you would like to see it entirely. If you would like to just see one field-value pair, you would use HGET. HMGET would be useful if you’d like to view multiple specific field-value pairs of a hash.
$ redis-cli hgetall cat1
1) "breed"
2) "norwegian"
Reading all these values in the command line might be good for small lists or sets, but if you’re dealing with thousands of rows, this won’t work. Using the --csv flag, you can get CSV output that can be opened in a text editor or spreadsheet.
Deleting Data
Another common operation in Redis is deleting data. You might use this to delete problematic caches, clear up a backlogged message queue, or reset your local Redis data.
The DEL command will delete one or more values by their keys. If you try to delete a non-existent key, it is ignored, and the server will reply with the number of successfully deleted keys.
$ redis-cli del cats
(integer) 1
If you realize you made a mistake, you can restore a key using the RESTORE command.
There are other type-specific delete commands to remove elements, members, or fields from a key:
- To remove specific elements from a list instead of deleting the whole key, you would use
LREM - To remove a subset of elements in a list, you could use
LTRIM - For sets,
SREMwould remove one or more members SPOPwould be useful for removing a member from a set and returning it as outputZREMwill remove a single or multiple members from a sorted setHDELwould help delete a field from a hash
For a full list use help @<type> in interactive mode.
Bulk Data Insertion Using the Redis CLI
If you want to migrate data from one Redis instance to another or upload a large sample data set, you could write a bash script to run SET repeatedly, or you can add data in bulk using the --pipe flag. This flag takes the path of the file containing all your Redis operations.
Since different data types are created using different commands, you have to specify the command when inserting data, even in bulk. For example, consider the insert-data.txt file below:
SET counter 1
SET tracker 2
LPUSH cities Paris Berlin
LPUSH countries France Germany
RPUSH fruits apple orange
RPUSH vegetables carrot cucumber
SADD tiers s a b c d
ZADD scores 52 jane 47 paul
HMSET user01 name Jane age 23
HMSET user02 name Reggie age 20
You can insert the data above by running:
$ cat insert-data.txt | redis-cli --pipe
All data transferred. Waiting for the last reply...
Last reply received from server.
errors: 0, replies: 10
It’s slightly arduous to get all these commands right, but it will be faster than connecting to Redis multiple times to loop over a shell command.
Running Lua Scripts with Redis CLI
Lua is a lightweight scripting language that you can use to interact with Redis servers. If you’d like more flexibility when using Redis and take advantage of features such as comments, variables, conditional statements, functions, and loops, Lua scripts can be pretty helpful.

Lua scripts are evaluated when the --eval flag is used. This flag takes a path to a Lua file, but you can also provide keys or other arguments to the script.
For example, this add-counters.lua script adds five counters to the Redis database:
for i=1, 5 do
    redis.call('set', 'counter' .. i, i)
end
To run it:
$ redis-cli --eval add-counters.lua
(nil)
Keys are made available within the script in the KEYS table and arguments in the ARGV table. Here is an example of how you would use them:
for i=1, #KEYS do
    redis.call('hmset', 'user0' .. i, 'name', KEYS[i], 'age', ARGV[i])
end
The keys and arguments are passed to the script as a comma-separated list:
$ redis-cli --eval add-users.lua Jane , 23 , John , 20 , Paula , 30
(nil)
Redis provides a Lua debugger that’s especially useful for debugging complicated Lua scripts. To use it, pass the --ldb flag.
$ redis-cli --ldb --eval add-users.lua Jane , 23 , John , 20 , Paula , 30
Lua debugging session started, please use:
quit    -- End the session.
restart -- Restart the script in debug mode again.
help    -- Show Lua script debugging commands.

* Stopped at 1, stop reason = step over
-> 1   for i=1, #KEYS do
lua debugger>
The debugger will save you a lot of time as you’re tweaking your Lua scripts.
Interactive vs Command-Line Arguments
The Redis CLI can be called using command-line arguments or by starting an interactive shell.
When you specify command-line arguments using redis-cli, the Redis client sends them to the server, prints the results, and then exits. You will have to run redis-cli again with new commands to issue more. That’s how all the examples in this tutorial have worked so far.
In interactive mode, after a command is processed by the server, results are printed, and you can continue issuing further commands in the prompt. You do not need to keep typing redis-cli. The CLI can be run in interactive mode by executing redis-cliwithout any arguments:
$ redis-cli
127.0.0.1:6379[2]>
In interactive mode, the Redis CLI includes command completion, hints, and better help information, so you might spend a lot of time here when you’re debugging Redis.
Seeing a Summary of Redis Storage Contents
Some issues in Redis arise when your server is running a different version in testing than in production. The INFO command provides information and statistics about the Redis server, including version, operating system, uptime, clients, memory consumption, commands processed, and keyspace information.
$ redis-cli info
# Server
redis_version:6.2.3
redis_git_sha1:00000000
redis_git_dirty:0
redis_mode:standalone
os:Linux 5.8.0-53-generic x86_64
arch_bits:64
You can check the number of keys in a database using the DBSIZE command. The -n flag specifies the database you’d like to check. This can be especially useful when debugging and tracking keys added to your database.
$ redis-cli -n 0 dbsizeFor real-time information and stats about the server, use the --stat flag. Every second it prints out the number of clients connected, requests, connections, and keys.
$ redis-cli --stat
------- data ------ --------------------- load -------------------- - child -
keys       mem      clients blocked requests            connections
1          855.56K  1       0       122 (+0)            36
1          855.56K  1       0       123 (+1)            36
1          855.56K  1       0       124 (+1)            36
1          855.56K  1       0       125 (+1)            36
This can come in handy when you need to find out the number of clients connected to a server, how requests are being processed, or how many connections have been made recently.
More Redis Command-Line Features
While I offered an overview of some of the most important features Redis’s command-line interface has to offer, there are many other features you might want to learn.
For example, you can use the MONITOR command to view all server requests in real-time. Redis also provides support for pub/sub messaging, which you can access via the command-line.
Knowing how to use the Redis CLI enables you to take full advantage of its powerful features without the setup time required when using client libraries in your code. The Redis CLI is especially helpful for learning how Redis works, solving server issues, testing commands quickly, and Redis server monitoring, so it’s worth learning how to use it correctly.


It’s Really not that Complicated.
You can actually understand what’s going on inside your live applications.