How to Understand Log Levels
Mar 18, 2021 / Updated: Mar 11, 2026

More than once, I’ve heard experienced software developers say that there are only two reasons to log: either you log Information or you log an Error. The implication here is that either you want to record something that happened or you want to be able to react to something that went wrong.
In this article, we’ll take a closer look at logging and explore the fact that log levels are more than just black or red rows in your main logging system. When used correctly, they let you filter certain types of data to be logged to different destinations, have different retention times, and can be searched more easily in different structures of the data.
Why Logging?
While developing software, hopefully you write unit tests to validate isolated functionality in your code, add some integration tests, and maybe do some manual testing on top of that. But when your code is running in production, you need a way to get information about what code is being executed inside your software and have that accessible from the outside.
The most common way to do this is to add logging to your code. Usually, this code will then write to a destination, which can be a local file, a database, or a centrally controlled more advanced log solution. You can then access this information to get technical insights into what’s going on in the running code.
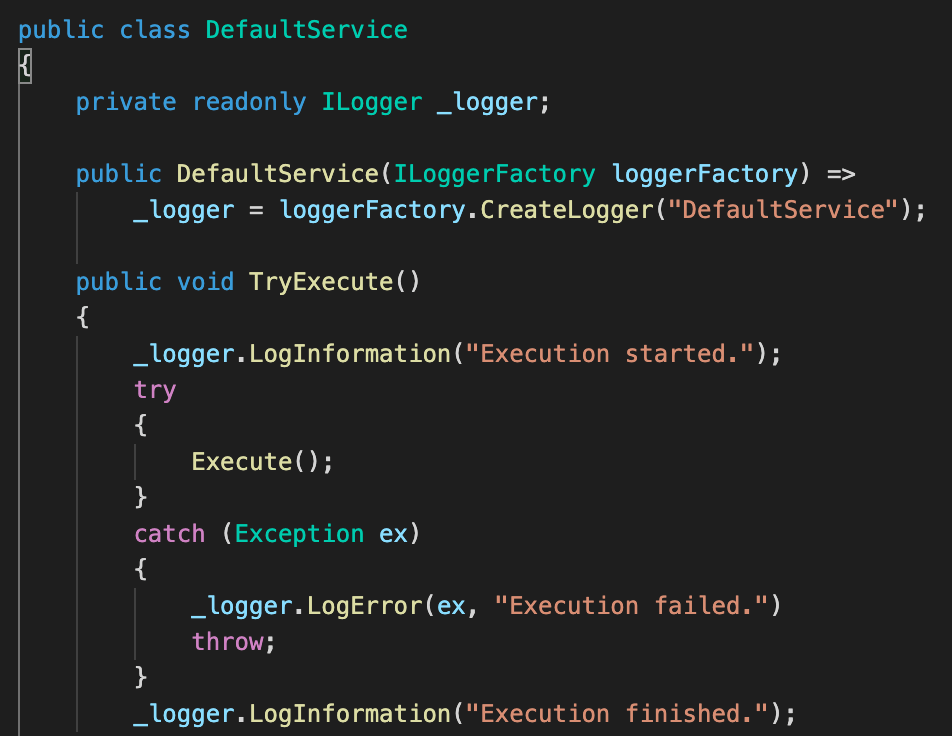
Log entries, depending on configuration, usually contain a time stamp, a severity level, a message entered in the code, sometimes which class/file is doing the logging, sometimes a stack trace from an error in the code, and other metadata about the execution context. When done right, this can help developers follow the flow of logic through the software.
Many use logging to log key events in the system, like orders completed, users registered, reviews written, and so on. With correctly structured data, you can pipe this data into different analysis tools to get more business insights. For example, usually, you turn to your logs when something goes wrong in the software. If logging is set up correctly, you’ll be able to figure out where the problem comes from and from which line of code.
If there’s not enough information in your logs, you might want to ensure that a lower level of logging is written to your logs, so you can get more details about what’s going on in your software. You can usually achieve this by using different log levels.
Understanding The Different Log Levels
Log levels convey the intention of the specific content of what’s being logged. This can help you filter different levels of log data into different destinations, enabling you to focus on the log level relevant to the current issue you’re facing. Logging to different destinations also allows you to have different retention levels for different logged content.
These are the most common log levels for logging libraries:
Critical*ErrorWarnInfoDebugTrace
* Sometimes under other names, such as Fatal or Fault.
Different languages and platforms, and their most popular logging libraries, actually support different log levels, even if the core functionality is there across them all.
Trace |
Debug |
Info |
Warn |
Error |
Critical |
|
|---|---|---|---|---|---|---|
| C#/.NET | ✔️ | ✔️ | ✔️ | ✔️ | ✔️ | ✔️ |
| Java | ✔️ | ✔️ | ✔️ | ✔️ | ✔️ | ✔️ (as Fatal) |
| Python | ✔️ | ✔️ | ✔️ | ✔️ | ✔️ | |
| Rust | ✔️ | ✔️ | ✔️ | ✔️ | ✔️ | |
| Swift | ✔️ | ✔️ | ✔️ | ✔️ (as Fault) |
||
| Kotlin | ✔️ | ✔️ | ✔️ | ✔️ | ✔️ |
Many logging libraries allow you to also handle an All scenario, where all the levels are written to the configured destinations. The None scenario, then, turns off all the logging. Some libraries also support a Custom scenario, where you can specify exactly which log levels to include.
Picking the Right Log Level
There is no right or wrong when it comes to picking a level of logging, but it’s important to set the same expectations throughout a project and maybe throughout an entire organization.
Here are a few best-practice suggestions as a starting point that any team should be able to build upon:
Critical: Used when your application is in an unrecoverable state. It crashes during startup configuration, or a framework-level component is not working as expected.
Example: Your app cannot start up correctly or your DI setup fails.Error: Used for errors that stop the flow of the execution. Usually used for unknown and unexpected errors in a central catch-all scenario for an application.
Example: Routing in your web app fails, or code in an MVC controller throws an exception.Warn: Used for errors that don’t stop the flow of execution. Usually, these errors are somewhat expected, since the logging code is added manually to these points in the code.
Example: Calling an external service, which you know can fail and you can silently recover from.Info: Used to log events in the normal flow of the code. Can be used for only system key events, to keep the volume of log data down.
Example: User clicked a call-to-action button or new user registered.Debug: Used for scenarios where the information in higher levels is not enough to debug a problem. Should record the flow through the system.
Example: Method X was called in class/object Y, to track different flows.Trace: Used to get as much detail possible, tracking the flow of data through the system. Can contain sensitive data. Should probably never be activated in production.
Example: Method X was called with parameter values Y and Z.
Usually, Critical, Error, and sometimes Warn levels contain a full stack trace for full analysis of the technical context of the problem.
You will probably want different configurations for your logging between your local development environment, your testing environment, and your production environment. It’s worth noting that, with most logging libraries, configuring for one level includes the levels above it. For example, if you configure for the Info level, it’ll include all levels above it, too, in the logging. So you’ll also get Info, Warn (where available), Error, and Critical.
Some libraries allow you to set an upper limit as well, but this is for very specific scenarios, since you would rarely want to see Error logs but not Critical logs, for example.
However, all solutions have different needs, and these needs can change depending on what problem occurs when. Let’s glance through some examples of various setups.
Local Development Environment
In a development environment on your local machine, you probably want to start off with the Debug level of logging. You can lower it to Trace if more detailed issues need diagnosed, or increase it to Info if it gets too noisy.
You’ll probably always want to write to local files on your file system for quick access, and avoid writing to any central logging destination, unless you’re explicitly testing the integration itself. This is because it can generate a lot of data over time, even with a small team, which usually increases cost quite a lot.
Testing Environment
In a testing environment, which is not on your local machine, you probably want to set the logging level to Info and then temporarily turn the level down to Debug and Trace as needed for the moment. If you’re not interested in the normal flow of the app and only want to catch errors, you can actually set the logging level to Error.
As it’s a test environment, you should only have test data logging here, so lower logging levels should not be logging sensitive production data. You don’t have to worry about that aspect here, even if you should always be vigilant of it.
Since this is not a local machine, you probably don’t have (and maybe shouldn’t have) easy access to the machine’s local disk. This is a good opportunity to use a central logging solution (there are plenty of those on the market at the moment at various pricing levels).
Production Environment
In a production environment, you could start out by configuring your logging to write Info and higher to a centralized logging service, such as a SaaS solution in the cloud. You should consider writing the Error level and higher to local disk files, in case the SaaS has any technical issues. Remember to manage the retention of these local logs to avoid being incompliant with data privacy rules and to keep costs down.
For the very complicated and hard-to-solve bugs, you need to be able to activate Debug and Trace level logging. To comply with data privacy rules without too much hassle, consider writing only these two low levels to local files, which can easily be deleted, and set a very short retention time for them. Always consider using a staging environment first, when using the Trace level and only use the production environment as the last way out.
You can also consider forwarding just the Info entries to an analysis tool of choice, to analyze key business events being triggered in your system. Some logging libraries support sending additional data in their entries, which can make this scenario more powerful.
If needed, you can also configure Error and Critical to log to another external system, maybe another SaaS, that sends out alerts for these log entries. Many existing SaaSes for logging have this functionality built-in, so there’s usually not a need for this configuration, but it’s good to know it’s an option.
This would then mean that you’re double-logging between two systems, but since you hopefully won’t have a large volume of this kind of log entry, you don’t have to worry too much about cost and you’re only using the right tool for the right job.
The Caveats of Logging
Logging a lot of data might be the only way to solve some of the craziest bugs created out there, but there are some downsides of logging too much.
Depending on the solution you choose for logging data, too much data could make it very hard to easily search through your logs. If the logging is split into different files for different days (or hours), it’s hard to analyze a trend over time.
Normally, no matter what solution you have in place for logging, the more data you log, the higher the cost will be. Even if you’re logging to the local disk of the server, space can get used up quickly over time.
There is also a major security risk of leaking sensitive data if you store too much data, with too detailed information, for too long. With all the new privacy rules out there, you also risk being noncompliant for things like GDPR, if you store personal information too long, even in local files.
Conclusion
Logging is something you should include in your workflow right from the beginning when writing your software. Setting it up, and with the right strategy, will enable you to produce well-running software, monitor it in a robust way, and quickly access details about any problems that occur. Just keep the potential pitfalls in mind, such as cost, searchability, and security.
Having a solid strategy for which log level to use for what scenario is crucial for a long-term path growth path for your software. This will allow you to extend your logging in the future, making use of more refined and mature logging tools, as your software grows and the need inevitably shows itself.