Tips & Tricks for using Kubernetes
Docker Swarm vs Kubernetes
Businesses around the world are increasingly turning to container technology to streamline the process of deploying and managing complex, cloud native applications. Containers bundle all necessary dependencies into a single package, offering portability, speed, security, scalability, and ease of management, making them the preferred choice over traditional virtual machines (VMs). However, to scale container use, a container orchestration tool is required – a framework for managing multiple containers. Docker Swarm and Kubernetes are currently the most widely used container orchestration platforms. Both have their own advantages and disadvantages and serve different purposes. In this article, we will evaluate both options in order to assist you in determining which container orchestration tool is the most suitable for your cloud native organization.
Docker Swarm
Docker Swarm is an open-source container orchestration platform developed and maintained by Docker. At its core, Docker Swarm converts multiple Docker instances into a single virtual host. The structure of a Docker Swarm cluster typically consists of three components: nodes, services and tasks, and load balancers. Nodes are individual instances of the Docker engine that control the cluster and manage the containers used to run services and tasks. Load balancers are also included in Docker Swarm clusters to route requests among nodes.
Advantages of Docker Swarm
Docker Swarm is simple to install, particularly for those new to container orchestration. It is lightweight and easy to use. Additionally, it requires less time to learn compared to more complex orchestration tools. It also offers automated load balancing within Docker containers, while other container orchestration tools require manual effort. Docker Swarm is compatible with the Docker CLI and works seamlessly with existing Docker tools, such as Docker Compose. Furthermore, no configuration changes are needed if your system is already running inside Docker in a public cloud environment.
Disadvantages of Docker Swarm
Despite its benefits, there are a few drawbacks to using Docker Swarm that should be considered. It is lightweight and tied to the Docker API, which limits its functionality compared to Kubernetes. Its automation capabilities are also not as advanced as those provided by Kubernetes.
Kubernetes
Kubernetes is an open-source container orchestration platform that was initially designed by Google to manage their containers in their own public cloud. Its cluster structure is more complex than that of Docker Swarm, typically consisting of builder and worker nodes divided into pods, namespaces, config maps, and so on.
Advantages of Kubernetes
Kubernetes offers a wide range of benefits to teams seeking a robust container orchestration tool for their cloud native applications:
It has a large open-source community and is backed by Google Cloud. It supports all operating systems. It can sustain and manage large architectures and complex workloads. It has automated capabilities and supports automatic scaling. It includes built-in monitoring and offers a variety of available integrations. It is offered by all three major cloud providers: Google Cloud, Azure, and AWS.
Due to its extensive community support and ability to handle even the most complex deployment scenarios, Kubernetes is often the first choice for enterprise development teams managing microservice-based applications in public clouds.
Disadvantages of Kubernetes
Despite its comprehensive feature set, Kubernetes does have a few drawbacks:
It has a complex installation process and a steep learning curve. It requires the installation and learning of separate CLI tools. The transition from Docker Swarm to Kubernetes can be complicated and difficult to manage.
In some situations, Kubernetes can be overly complex, leading to reduced productivity in a cloud native environment.
Docker Swarm vs Kubernetes: similarities and differences
In this analysis, two leading container orchestration platforms were compared: Docker Swarm and Kubernetes. Both options are open-source and support multiple cloud providers, but differ in terms of their ease of use and feature sets.
The platforms were evaluated based on key factors including setup requirements, application deployment capabilities, availability and scaling, monitoring features, security protocols, and load balancing. It was found that Docker Swarm is simpler to install and configure and has a shorter learning curve compared to Kubernetes. However, Kubernetes offers a wider range of options for application deployment and is more fault tolerant and self-healing, with built-in monitoring and support for automatic scaling. In terms of security, Kubernetes offers a variety of protocols, while Docker Swarm relies on TLS. Both platforms offer load balancing, but Kubernetes requires the use of an external tool.
K3s was also introduced as a potential alternative for organizations looking for the capabilities of Kubernetes without the complexity of its learning curve in a cloud native environment. K3s is a lightweight, easy-to-use platform that is CNCF certified and offers the complete Kubernetes API in a small binary package. It can be easily customized with third-party add-ons and is an ideal choice for those familiar with Docker Swarm who are not yet ready for full-on Kubernetes.
Ultimately, the choice between Docker Swarm and Kubernetes depends on the needs of your organization. If you are new to the world of containers and do not have complex workloads to manage, Docker Swarm is a simple and easy-to-use solution. On the other hand, if your applications are complex and you require a comprehensive package with features such as monitoring, security protocols, self-healing, high availability, and flexibility, Kubernetes is the better choice. K3s offers a middle ground for those who need the capabilities of Kubernetes but are put off by its learning curve.
In conclusion, Docker Swarm and Kubernetes are both effective container orchestration tools, each serving specific use cases. By carefully evaluating your organization’s needs and goals, you can determine which platform is the best fit for your cloud native environment.
Kubernetes as a service
Kubernetes (K8s) is an open-source system used for automating the deployment, scaling, and management of containerized applications. However, managing K8s can be challenging and costly. As a result, it is common to find platforms that offer K8s as a managed service.
This article will review three of the most popular managed K8s services currently available: Google Kubernetes Engine (GKE), Azure Kubernetes Service (AKS), and Amazon Elastic Container Service for Kubernetes (Amazon EKS).
Current Version
The current version of any of the three platforms will likely be dated within a few weeks or even days of writing this article. Some versions of K8s may also be made available in beta or preview versions with some services, but not others. For instance, AKS previewed K8s 1.18.1 and 1.18.2 while Amazon EKS and GKE offered up to K8s 1.16.8.
The most important information, however, is the age of the current version at the time of use. When comparing the three options, Google Cloud has the most recent release (and this is likely to remain true), followed by Microsoft Azure, and then AWS. Bugs and security issues can be resolved in Google’s version, while with Microsoft Azure (and AWS to some extent), availability may be a concern.
Automatic Update
GKE stands out in this regard by providing a fully automated update for the cluster. AKS follows in second place, as it allows for a simple command to upgrade the cluster. Amazon EKS has the most complex upgrade steps and requires command-line instructions from the user, particularly when upgrading nodes.
Resource Monitoring
Google Cloud offers its integrated monitoring platform, called Stackdriver, for K8s monitoring. It can monitor the master and nodes, as well as integrate logging and all K8s components within the platform without any additional manual steps from the user.
Microsoft Azure provides a combined solution with at least two offerings: you can assess the health of each container using Azure Monitor, and you can monitor K8s components using Application Insights. However, there is a catch: to monitor K8s components, you must configure a service-mesh solution called Istio.
AWS does not offer an integrated monitoring solution. Instead, it relies on third-party solutions.
Availability
Google Cloud has the best availability of the three, followed by Microsoft Azure, which will catch up to (and surpass) Google in Q2 2019, when the service becomes available in Latin America and Africa. AWS lags significantly behind because it does not offer the service in Latin America, Africa, or Oceania. It is worth noting that only Microsoft Azure currently has data centers in Africa.
Node Pools
Node pools allow the cluster to have different types of machines for different workloads. For example, database systems require more RAM and better disks, while CPU-intensive tasks like machine learning algorithms require a stronger CPU. With node pools, the user can specify where each service runs, depending on the workload requirements. All three providers offer node pools, but GKE and AKS provide a more seamless experience.
Public Cloud
GKE, AKS, and Amazon EKS are all public cloud offerings, meaning they offer infrastructure as a service (IaaS) over the internet. This allows users to access a shared pool of computing resources, including storage, networking, and processing power.
Virtual Machines
Virtual Machines (VMs) allow users to run multiple operating systems and applications on a single physical server, providing flexibility and cost savings. GKE, AKS, and Amazon EKS all offer the option to run K8s on VMs, but GKE and AKS offer a more seamless experience.
Google Cloud
Google Cloud is a comprehensive cloud computing platform that offers a range of services, including infrastructure as a service (IaaS), platform as a service (PaaS), and software as a service (SaaS). Google Cloud is a leader in the public cloud market, and its offerings, including GKE, are highly regarded for their security, reliability, and scalability.
Cloud Native
Cloud native refers to applications and infrastructure that are designed to be built, deployed, and run on the cloud. All three providers offer cloud native solutions, but GKE and AKS offer a more seamless experience with their managed services and integrations with cloud native tools such as Istio and Envoy.
In conclusion, GKE, AKS, and Amazon EKS are all viable options for managed K8s services. GKE stands out for its recent release, fully automated updates, and seamless integration with Google Cloud services. AKS is a strong competitor, offering a simple command for cluster updates and integration with Azure services. Amazon EKS has the most complex upgrade process and relies on third-party solutions for monitoring, but it is still a viable option for those already utilizing AWS services.
Docker Hub vs. Helm for Deploying Prometheus on Kubernetes
Prometheus Kubernetes is a leading open-source monitoring solution for container environments, designed specifically for Kubernetes. It was created at SoundCloud by ex-Googlers and is the second project accepted by the Cloud Native Computing Foundation (CNCF), after Kubernetes itself. Some of Prometheus’ key features include its multidimensional data model with a time-series database, its own query language (PromQL), support for both pull and push mode metric scraping, automatic service discovery, and multiple integrations with Kubernetes and other CNCF open source projects.
Once you’ve chosen to use Kubernetes, you’ll need to decide how to deploy Prometheus and related applications such as Grafana to your cluster. There are several options available, including using YAML manifests, package managers like Helm and Cloudsmith, or the command-line tool kubectl. This tutorial will compare the manual approach using Docker Hub, static manifests, and kubectl with the automated method using Helm and predefined charts.
Deploying Applications to Kubernetes
To deploy applications to Kubernetes, you’ll create a deployment, which will cause the Kubernetes master to schedule the instances defined in the deployment manifest. The deployment controller will then monitor these instances and reschedule them if necessary (e.g. if a node goes down or is cordoned off), providing a self-healing mechanism for the deployed applications.
Creating a Prometheus Deployment Manually with Docker Hub and kubectl
To deploy Prometheus to a Kubernetes cluster using a static YAML manifest and Docker Hub images, you’ll first need to have a running cluster with kubectl configured. It’s also a good idea to create a separate namespace for monitoring to make it easier to manage the monitoring stack. To create a namespace, run the following command:
kubectl create namespace monitoringNext, you’ll need to grant Prometheus access to the metrics of the resources in the Kubernetes control plane. To do this, create a ClusterRole and ClusterRoleBinding by writing the following configuration to a file named role-config.yaml:
apiVersion: rbac.authorization.k8s.io/v1
kind: ClusterRole
metadata:
 name: prometheus
rules:
- apiGroups: [""] resources:
 - endpoints
 - nodes
 - nodes/proxy
 - pods
 - services
 verbs: ["get", "list", "watch"]
- apiGroups:
 - extensions
 resources:
 - ingresses
 verbs: ["get", "list", "watch"]
- nonResourceURLs: ["/metrics"]
 verbs: ["get"]
---
apiVersion: rbac.authorization.k8s.io/v1
kind: ClusterRoleBinding
metadata:
 name: prometheus
roleRef:
 apiGroup: rbac.authorization.k8s.io
 kind: ClusterRole
 name: prometheus
subjects:
- kind: ServiceAccount
 name: default
 namespace: monitoring
Then, run the following command:
kubectl apply -f role-config.yamlThe output should include:
clusterrole.rbac.authorization.k8s.io/prometheus configured
clusterrolebinding.rbac.authorization.k8s.io/prometheus configuredclusterrole.rbac.authorization.k8s.io/prometheus configured
clusterrolebinding.rbac.authorization.k8s.io/prometheus configured
Configuring Prometheus with Docker Hub on Kubernetes
To configure Prometheus, you’ll create a ConfigMap that will be mounted inside the Prometheus container. Write the following to configmap.yaml:
apiVersion: v1
kind: ConfigMap
metadata:
 name: prometheus-server-conf
 labels:
   name: prometheus-server-conf
 namespace: monitoring
data:
 prometheus.yml: |-
   global:
     scrape_interval: 5s
     evaluation_interval: 5s
   scrape_configs:
     - job_name: 'kubernetes-apiservers'
       kubernetes_sd_configs:
       - role: endpoints
       scheme: https
       tls_config:
         ca_file: /var/run/secrets/kubernetes.io/serviceaccount/ca.crt
       bearer_token_file: /var/run/secrets/kubernetes.io/serviceaccount/token
       relabel_configs:
       - source_labels: [__meta_kubernetes_namespace, __meta_kubernetes_service_name, __meta_kubernetes_endpoint_port_name]
         action: keep
         regex: default;kubernetes;https
     - job_name: 'kubernetes-nodes'
       scheme: https
       tls_config:
         ca_file: /var/run/secrets/kubernetes.io/serviceaccount/ca.crt
       bearer_token_file: /var/run/secrets/kubernetes.io/serviceaccount/token
       kubernetes_sd_configs:
       - role: node
       relabel_configs:
       - action: labelmap
         regex: __meta_kubernetes_node_label_(.+)
       - target_label: __address__
         replacement: kubernetes.default.svc:443
       - source_labels: [__meta_kubernetes_node_name]
         regex: (.+)
         target_label: __metrics_path__
         replacement: /api/v1/nodes/${1}/proxy/metrics
     - job_name: 'kubernetes-pods'
       kubernetes_sd_configs:
       - role: pod
       relabel_configs:
       - source_labels: [__meta_kubernetes_pod_annotation_prometheus_io_scrape]
         action: keep
         regex: true
       - source_labels: [__meta_kubernetes_pod_annotation_prometheus_io_path]
         action: replace
         target_label: __metrics_path__
         regex: (.+)
       - source_labels: [__address__, __meta_kubernetes_pod_annotation_prometheus_io_port]
         action: replace
         regex: ([^:]+)(?::\d+)?;(\d+)
         replacement: $1:$2
         target_label: __address__
       - action: labelmap
         regex: __meta_kubernetes_pod_label_(.+)
       - source_labels: [__meta_kubernetes_namespace]
         action: replace
         target_label: kubernetes_namespace
       - source_labels: [__meta_kubernetes_pod_name]
         action: replace
         target_label: kubernetes_pod_name
     - job_name: 'kubernetes-cadvisor'
       scheme: https
       tls_config:
         ca_file: /var/run/secrets/kubernetes.io/serviceaccount/ca.crt
       bearer_token_file: /var/run/secrets/kubernetes.io/serviceaccount/token
       kubernetes_sd_configs:
       - role: node
         relabel_configs:
       - action: labelmap
         regex: __meta_kubernetes_node_label_(.+)
       - target_label: __address__
         replacement: kubernetes.default.svc:443
       - source_labels: [__meta_kubernetes_node_name]
         regex: (.+)
         target_label: __metrics_path__
         replacement: /api/v1/nodes/${1}/proxy/metrics/cadvisor
      - job_name: 'kubernetes-service-endpoints'
        kubernetes_sd_configs:
        - role: endpoints
        relabel_configs:
        - source_labels: [__meta_kubernetes_service_annotation_prometheus_io_scrape]
          action: keep
          regex: true
        - source_labels: [__meta_kubernetes_service_annotation_prometheus_io_scheme]
          action: replace
          target_label: __scheme__
          regex: (https?)
        - source_labels: [__meta_kubernetes_service_annotation_prometheus_io_path]
          action: replace
          target_label: __metrics_path__
          regex: (.+)
        - source_labels: [__address__, __meta_kubernetes_service_annotation_prometheus_io_port]
          action: replace
          target_label: __address__
          regex: ([^:]+)(?::\d+)?;(\d+)
          replacement: $1:$2
        - action: labelmap
          regex: __meta_kubernetes_service_label_(.+)
        - source_labels: [__meta_kubernetes_namespace]
          action: replace
          target_label: kubernetes_namespace
        - source_labels: [__meta_kubernetes_service_name]
          action: replace
          target_label: kubernetes_name
This ConfigMap is created in the “monitoring” namespace and includes several job descriptions defining which metrics to scrape. The kubernetes-apiserver job pulls data from the API servers, the kubernetes-nodes job collects node metrics, and the kubernetes-cadvisor job collects metrics for cAdvisor.
Scraping Services and Pods with Prometheus
To allow Prometheus to scrape metrics from services and pods, you’ll need to add the annotations prometheus.io/scrape and prometheus.io/port to their metadata section in the definitions.
Now that you have a ConfigMap configuration ready, apply it to the cluster with:
kubectl apply -f configmap.yamlTo read the metrics, you’ll create a deployment by generating a new file named deployment.yaml and using the following configuration:
apiVersion: apps/v1
kind: Deployment
metadata:
 name: prometheus-deployment
 namespace: monitoring
spec:
 replicas: 1
 template:
   metadata:
     labels:
       app: prometheus-server
   spec:
     containers:
     - name: prometheus
       image: prom/prometheus:v2.12.0
       args:
         - "--config.file=/etc/prometheus/prometheus.yml"
         - "--storage.tsdb.path=/prometheus/"
       ports:
         - containerPort: 9090
       volumeMounts:
         - name: prometheus-config-volume
           mountPath: /etc/prometheus/
         - name: prometheus-storage-volume
           mountPath: /prometheus/
     volumes:
       - name: prometheus-config-volume
         configMap:
           defaultMode: 420
           name: prometheus-server-conf
       - name: prometheus-storage-volume
         emptyDir: {}
You may be wondering what all of this has to do with Docker Hub. The Docker Hub image sees its use as part of the configuration. It’s under the spec.template.spec.containers.image.Once the pods are running, you should be able to access the Prometheus dashboard by proxying the application to your local machine with:
kubectl port-forward $(kubectl get pods -n monitoring --template '{{range .items}}{{.metadata.name}}{{"\n"}}{{end}}') -n monitoring 8080:9090Then, visit https://localhost:8080 in your web browser to view the Prometheus metrics endpoint.
Alerts and Additional Metrics
While the steps outlined in this process do not fully establish a comprehensive monitoring solution, they are a good start. Currently, there is no alerting set up and many important metrics are missing. Additionally, no useful dashboards have been created. To ensure that your monitoring stack is ready for production usage, further configuration is required.
Using YAML manifests and Docker Hub images to deploy Prometheus can be time-consuming, but it allows for complete control over the configuration. With this method, every service, deployment, and StatefulSet is under your direct control. On the other hand, when using Helm charts, you are only able to manipulate a few settings specified in a values.yaml file. If you do not heavily rely on community components and need to create your own YAML files, the value of Helm may be reduced. Some users also prefer to keep things simple and avoid dealing with Helm’s server-side component, Tiller, and its associated complexities such as high availability and role-based access control.
However, many people prefer the higher level of automation and abstraction provided by Helm. We will discuss this further in the next section.
Creating a Prometheus Deployment with Helm
Helm is the most widely used package manager with Kubernetes and is part of the Cloud Native Computing Foundation (CNCF) along with Kubernetes and Prometheus. Other options such as Cloudsmith and Cloud Native Application Bundles (CNAB) are not as popular.
Benefits of Helm Charts with Kubernetes and Prometheus
One of Helm’s main advantages is its unique packaging format called a Chart, which is a collection of files that describe Kubernetes resources. A single chart can deploy a single resource, like a pod or a cluster rule, but they are usually used to deploy sets of microservices, full application stacks, and cluster configurations as a single manageable deployment. Helm uses a powerful templating engine that allows for control over flow, environment variables, and descriptions.
Prometheus and Grafana are not the only products that benefit from charts. For another example of a deployment using charts, see this tutorial for deploying the ELK Stack on Kubernetes with Helm.
Helm Chart Repositories
Helm also uses chart repositories, which are essentially HTTP servers that store charts that have been curated and managed. These repositories can be public (maintained by the community) or private and self-hosted. Chart repositories allow you to install and implement a fully preconfigured monitoring stack (such as Prometheus) with just a few commands.
We will not go over the Helm installation and configuration process here. For more information, refer to the official documentation.
To add a repository and install the Prometheus Operator, use the following commands:
helm repo add stable https://kubernetes-charts.storage.googleapis.com/
helm install stable/prometheus-operator --name-template po
The Prometheus Operator repository consists of charts for the following services:
- Prometheus-operator
- Prometheus
- Node-exporter
- Kube-state-metrics and service monitors
- Grafana with dashboards and alerts
To view Grafana in your browser, start a port-forwarding using these commands:
Grafana should be accessible at https://localhost:3000. You can log in using “admin” as the username and “prom-operator” or “admin” as the password.
For more information on this topic, see our Best Practices for Monitoring Kubernetes using Grafana. You can also check out our tutorial on deploying InfluxDB and Grafana with Helm to K8s.
Instead of spending hours writing YAML manifests, selecting the appropriate Docker Hub image, and troubleshooting
Summary
Prometheus is an open-source monitoring solution designed specifically for use with Kubernetes, a tool for orchestrating container-based distributed systems. It has a number of key features, including a multidimensional data model with a time-series database, its own query language (PromQL), support for both pull and push mode metric scraping, automatic service discovery, and multiple integrations with Kubernetes and other CNCF open source projects. To deploy Prometheus to a Kubernetes cluster, there are several options available including using YAML manifests, package managers like Helm and Cloudsmith, or the command-line tool kubectl. This tutorial focused on the manual approach using Docker Hub, static manifests, and kubectl, walking through the steps of creating a namespace for monitoring, granting Prometheus access to the metrics of the resources in the Kubernetes control plane, configuring Prometheus with a ConfigMap, and enabling scraping of metrics from services and pods. The tutorial also covered the process of creating a deployment to read the metrics and accessing the Prometheus dashboard via a metrics endpoint.
A practical guide to Kubernetes logging
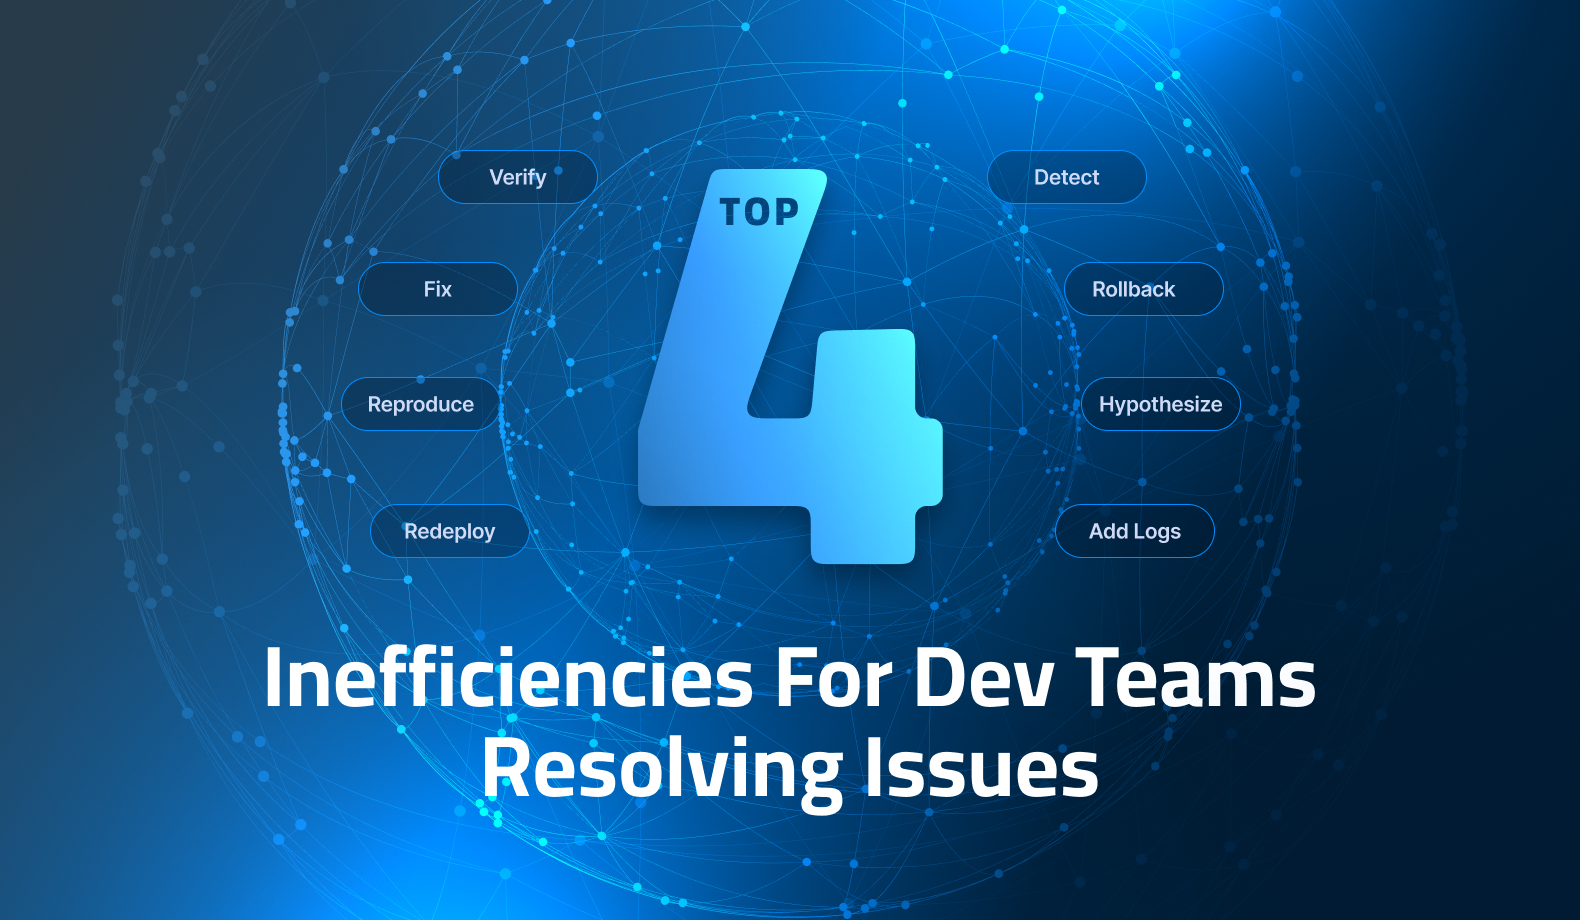
Kubernetes has revolutionized the way containerized applications are managed and maintained, offering a comprehensive selection of features to ensure reliable deployment. However, Kubernetes comes with its own set of distinct logging challenges in order for engineers to gain full observability into their containers. From scaling capabilities and self-healing processes through declarative configurations – all these components must work together seamlessly if successful log management is desired.
With Kubernetes, one must keep an eye on a constantly changing environment comprising dozens of machines and hundreds of containers that require vigilant monitoring. Each layer has its own logs which need to be closely monitored in order for the system to remain secure and stable – it’s no small feat!
Don’t be anxious–getting visibility into Kubernetes doesn’t have to be a hassle! Luckily, there’s plenty of literature and tools specifically designed for this purpose. In this article we’ll explore some of the best logging solutions that work seamlessly with Kubernetes’ architecture so you can start troubleshooting quickly and easily.
A Simple Example: Containerized application logging with Kubelet
Logging to stdout and stderr standard output streams:
If you’re running apps in a Kubernetes cluster, it’s important to know about the logs being generated. Best practices suggest writing log messages for your containerized applications straight to stdout and stderr streams – but don’t worry about losing them! Kubelet is always on guard, collecting these streams and saving them as local files that are easily accessible with Kubernetes tools.
Let’s take a look at an example pod manifest that will result in running one container logging to stdout:
apiVersion: v1 kind: Pod metadata: name: example spec: containers: - name: example image: busybox args: [/bin/sh, -c, 'while true; do echo $(date); sleep 1; done']To apply the manifest, run:kubectl apply -f example.yamlTo take a look at the logs for this container:kubectl logs example
To kick off your Kubernetes adventure, take a peek at this pod manifest! It contains the setup needed to have one container running and logging information to its standard output – perfect for beginners starting out in the fascinating world of containers.
Kubectl can only show a single pod’s logs at a time. If you need to aggregate many pods into a single stream, you would need to use kubetail command, or higher level log aggregation and management tools that we will discuss later in this article.
Using a sidecar for logging
Deploying a sidecar container beside your application can help capture the logs and stream them to stdout/stderr, ensuring important information is not missed. This provides an efficient method of logging all data produced by your app!
Sidecar Patterns provide a powerful way to manipulate logs, such as combining several streams into one or taking an application log and splitting it into distinct parts – all managed by separate sidecars.
For persisting container logs, the common approach is to write logs to a log file and then use a sidecar container:
apiVersion: v1
kind: Pod
metadata:
name: example
spec:
containers:
- name: example
image: busybox
args:
- /bin/sh
- -c
- >while true;
doecho "$(date)\n" >> /var/log/example.log;
sleep 1;
done
volumeMounts:
- name: varlog
mountPath: /var/log
- name: sidecar
image: busybox
args: [/bin/sh, -c, 'tail -f /var/log/example.log']
volumeMounts:
- name: varlog
mountPath: /var/log
volumes:
- name: varlog
emptyDir: {}
By running two containers within a single pod, users can take advantage of the sidecar pattern. This allows for enhanced efficiency as data volumes and logs are easily accessible by both processes simultaneously.
Kubernetes logging architecture
Logging is a critical part of any Kubernetes system; however, it can be difficult to comprehend the various types of logs generated and how they each should be used. So let’s take a closer look at node logging and cluster logging – two key elements for proper monitoring.
Kubernetes Node logging
Kubernetes containers can seamlessly log streaming output to stderr and stdout thanks to the kubelet service. This delegated logging process is governed by pre-defined parameters set in Kubernetes, allowing for efficient capture of events within a container environment.
By default, Docker container logs are stored in the /var/log/containers directory on your host. While you can use a range of different logging drivers with Docker, Kubernetes API unfortunately does not support configuring these drivers.
To protect your node from excessive storage consumption, make sure to set up log rotation after a container is terminated or restarted. This will ensure that kubelet keeps its logs on the host in an organized and efficient manner.
Kubernetes users can take advantage of external log rotation tools, like Docker’s log-opt or standard file shippers, to ensure that their application logs remain organized and intact in the event of a node eviction. Setting up a custom cron job is another simple way of managing your containerized workloads’ logging data.
To get a full picture of what’s happening on your machine, you may need to explore additional logs depending on the OS and services running. For example, in Linux journald logs can be retrieved using the journalctl command:
$ journalctl -u docker
-- Logs begin at Wed 2019-05-29 10:59:24 CEST, end at Mon 2019-07-15 10:55:17 CEST. --
jul 29 10:59:35 thinkpad systemd[1]: Starting Docker Application Container Engine...
jul 29 10:59:35 thinkpad dockerd[2172]: time="2019-05-29T10:59:35.285765854+02:00" level=info msg="libcontainerd: started new docker-containerd process" p
jul 29 10:59:35 thinkpad dockerd[2172]: time="2019-05-29T10:59:35.286021587+02:00" level=info msg="parsed scheme: \"unix\"" module=grpc
Docker containers and Kubernetes system processes such as kubelet, the master node process that manages nodes in a cluster, send their logs to journald. In addition, network proxy kube-proxy runs on each individual node logging vital information into /var/log directory.
To ensure the successful functioning of devices, logging kernel events may be necessary in certain cases. An excellent way to troubleshoot device driver problems is by utilizing Unix’s dmesg command – this will print out your message buffer from the kernel and provide you with essential insights into how things are running.
$ dmesg
[ 0.000000] microcode: microcode updated early to revision 0xb4, date = 2019-04-01
[ 0.000000] Linux version 4.15.0-54-generic (buildd@lgw01-amd64-014) (gcc version 7.4.0 (Ubuntu 7.4.0-1ubuntu1~18.04.1)) #58-Ubuntu SMP Mon Jun 24 10:55:24 UTC 2019 (Ubuntu 4.15.0-54.58-generic 4.15.18)
[ 0.000000] Command line: BOOT_IMAGE=/boot/vmlinuz-4.15.0-54-generic root=UUID=6e228d30-6415-4b41-b992-172d6899693e ro quiet splash vt.handoff=1
[ 0.000000] KERNEL supported cpus:
[ 0.000000] Intel GenuineIntel
[ 0.000000] AMD AuthenticAMD
[ 0.000000] Centaur CentaurHauls
[ 0.000000] x86/fpu: Supporting XSAVE feature 0x001: 'x87 floating point registers'
[ 0.000000] x86/fpu: Supporting XSAVE feature 0x002: 'SSE registers'
[ 0.000000] x86/fpu: Supporting XSAVE feature 0x004: 'AVX registers'
[ 0.000000] x86/fpu: Supporting XSAVE feature 0x008: 'MPX bounds registers'
[ 0.000000] x86/fpu: Supporting XSAVE feature 0x010: 'MPX CSR'
Kubernetes system components logging
Get a clearer understanding of the health and performance of your Kubernetes system through audit logs, events, kubelet and proxy node services. With all this information available to you at once – it’s easier than ever before to keep an eye on how everything is working together.
The following are the main system components of Kubernetes control plane:
- kube-apiserver – the API server serving as the access point to the cluster
- kube-scheduler – the element that determines where to run containers
- etcd – the key-value store used as Kubernetes’ cluster configuration storage
Some components run inside a container, while others run at the operating system level (usually as a systemd service).
Systemd services write their logs to journald, while components running in containers typically write their logs to the /var/log directory, unless the container engine has been configured to handle log output differently.
In the past, the system components of Kubernetes generated log messages using the klog logging library, which resulted in log messages that were not uniformly structured and were therefore difficult to parse, query, and analyze. However, with the recent release of Kubernetes v1.19, a new option has been added to klog that allows for structured logging in both text and JSON format. This will make it easier to work with Kubernetes system logs.
Structured logging
Structured logging in klog consists of a list of key-value pairs that provide a well-defined structure for the payload. This structured format can be enabled by using the “–logging-format=json” flag, which will cause the log output to be in JSON format.
It’s important to keep in mind that structured logging (both the string and JSON options) is currently in alpha testing as of Kubernetes v1.19, with adoption being implemented incrementally. This means that you may encounter issues such as system logs that are still unstructured, changes in log formatting, or klog flags that are not yet supported for JSON. You can check the documentation for updates on the status and features of structured logging at this link.
Kubernetes events
Kubernetes events are notifications that provide information about changes in the state of Kubernetes resources and any errors that may have occurred, such as exceeded resource quotas or pending pods. They can also include informational messages.
You can use the command “kubectl get events -n <namespace>” to retrieve all events within a specific namespace.
LAST SEEN   TYPE      REASON                  OBJECT                                  MESSAGE
4m22s       Normal    ExternalProvisioning    persistentvolumeclaim/mysql-pv-claim    waiting for a volume to be created, either by external provisioner "docker.io/hostpath" or manually created by system administrator
4m22s       Normal    Provisioning            persistentvolumeclaim/mysql-pv-claim    External provisioner is provisioning volume for claim "default/mysql-pv-claim"
4m22s       Normal    ProvisioningSucceeded   persistentvolumeclaim/mysql-pv-claim    Successfully provisioned volume pvc-b5419197-f122-4263-9c78-e9fb457db6304m22s       Warning   FailedScheduling        pod/wordpress-57b89f8b5b-gt6bv          pod has unbound immediate PersistentVolumeClaims
4m20s       Normal    Scheduled               pod/wordpress-57b89f8b5b-gt6bv          Successfully assigned default/wordpress-57b89f8b5b-gt6bv to docker-desktop
4m18s       Normal    Pulled                  pod/wordpress-57b89f8b5b-gt6bv          Container image "wordpress:4.8-apache" already present on machine
4m18s       Normal    Created                 pod/wordpress-57b89f8b5b-gt6bv          Created container wordpress
4m18s       Normal    Started                 pod/wordpress-57b89f8b5b-gt6bv          Started container wordpress
4m22s       Normal    SuccessfulCreate        replicaset/wordpress-57b89f8b5b         Created pod: wordpress-57b89f8b5b-gt6bv
You can use the command “kubectl describe pod <pod-name>” to get detailed information about a specific pod, including a section that lists the latest events.
Events:
Type     Reason            Age                    From                     Message
----     ------            ----                   ----                     -------
Warning  FailedScheduling  9m44s                  default-scheduler        persistentvolumeclaim "mysql-pv-claim" not found
Warning  FailedScheduling  9m44s (x2 over 9m44s)  default-scheduler        pod has unbound immediate PersistentVolumeClaims
Normal   Scheduled         9m42s                  default-scheduler        Successfully assigned default/wordpress-mysql-694777bb76-tqn55 to docker-desktop
Normal   Pulled            9m40s                  kubelet, docker-desktop  Container image "mysql:5.6" already present on machine
Normal   Created           9m40s                  kubelet, docker-desktop  Created container mysql
Normal   Started           9m40s                  kubelet, docker-desktop  Started container mysql
Kubernetes audit logs
Audit logs are useful for compliance purposes because they provide a record of what happened, who did it, and when it happened. Kubernetes offers flexible auditing of kube-apiserver requests based on policies, which allows you to track all activities in chronological order. An example of an audit log might look like this:
{
 "kind":"Event",
  "apiVersion":"audit.k8s.io/v1beta1",
  "metadata":{ "creationTimestamp":"2019-08-22T12:00:00Z" },
  "level":"Metadata",
  "timestamp":"2019-08-22T12:00:00Z",
  "auditID":"23bc44ds-2452-242g-fsf2-4242fe3ggfes",
  "stage":"RequestReceived",
  "requestURI":"/api/v1/namespaces/default/persistentvolumeclaims",
  "verb":"list",
  "user": {
  "username":"user@example.org",
  "groups":[ "system:authenticated" ]
  },
  "sourceIPs":[ "172.12.56.1" ],
  "objectRef": {  "resource":"persistentvolumeclaims",
  "namespace":"default",
  "apiVersion":"v1"
  },
  "requestReceivedTimestamp":"2019-08-22T12:00:00Z",
  "stageTimestamp":"2019-08-22T12:00:00Z"
}
Kubernetes logging tools
It is hoped that this has assisted in obtaining a better understanding of the various logging layers and log types available in Kubernetes. While Kubernetes does not have log aggregation built in, it does come with optional logging agents for Elasticsearch, Stackdriver Logging (for use with Google Cloud Platform), and Fluentd as a node agent. The following sections will delve into each of these tools.
The general architecture for cluster log aggregation involves using a local agent, such as Fluentd or Filebeat, to collect data from various sources and send it to a central log management system. These agents are typically deployed on each node as a DaemonSet to gather all the logs on that node, although they can also be deployed per pod for more granular control. The local agents can also perform filtering and manipulation on the logs before sending them to the central log management system, which can help improve log ingestion and analysis or reduce log volume. It is highly recommended to include metadata from the node, such as the pod name, cluster ID, and region, as this can greatly aid in analysis and troubleshooting efforts.
Fluentd
Fluentd is an open-source log aggregator that allows you to collect various logs from your Kubernetes cluster, process them, and then send them to a data storage backend of your choice. It is native to Kubernetes and integrates seamlessly with Kubernetes deployments. One common method for deploying Fluentd is as a DaemonSet, which ensures that a Fluentd pod is running on each node. Like other log forwarders and aggregators, Fluentd adds useful metadata fields to logs, such as the pod name and Kubernetes namespace, which helps provide context.
ELK Stack
The ELK Stack (which stands for Elasticsearch, Logstash, and Kibana) is a popular open-source tool used for logging in Kubernetes. It is actually made up of four components:
- Elasticsearch: This component provides a scalable, RESTful search and analytics engine for storing Kubernetes logs.
- Kibana: This is the visualization layer, providing a user interface for querying and visualizing logs.
- Logstash: This is the log aggregator used to collect and process logs before sending them to Elasticsearch.
- Beats: Filebeat and Metricbeat are ELK-native lightweight data shippers used for sending log files and metrics to Elasticsearch.
ELK can be deployed on Kubernetes either on-premises or in the cloud. While Beats is Elasticsearch’s native shipper, a common alternative for Kubernetes installations is to use Fluentd to send logs to Elasticsearch (sometimes referred to as the EFK stack). These components work together to provide a complete logging solution for Kubernetes users. However, deploying and managing ELK at scale can be challenging.
Logz.io offers a fully-managed option for using the ELK stack to log Kubernetes, with built-in integrations and monitoring dashboards. This can be a convenient option for users who want to take advantage of the capabilities of the ELK stack without having to manage the deployment and maintenance themselves.
Google Stackdriver
Finally, there is Google Stackdriver.
Stackdriver is another Kubernetes-native logging tool that provides a centralized logging solution. If you’re using Google Kubernetes Engine (GKE), Stackdriver can be easily enabled using the following command:
gcloud container clusters create [CLUSTER_NAME] \
 --zone [ZONE]
 --project-id [PROJECT_ID]
 --enable-stackdriver-kubernetes \
 --cluster-version=latest
Endnotes
Once you have logging set up for your Kubernetes cluster, you can use it to monitor the health of your workloads and underlying infrastructure. Logging can also help you identify and resolve issues that may arise during the deployment of new production releases, helping you to prevent disruptions to the customer experience.
While kubectl and kubetail commands can be useful for manually inspecting logs, it is generally recommended to use a cluster-wide log aggregation and analysis tool like the ELK stack for monitoring clusters in production. It is also a good idea to keep your logs separate from the Kubernetes cluster running your monitored application, so that they remain accessible for troubleshooting even during cluster outages or other issues.
Implementing a production-ready logging solution for your services and setting up appropriate alerts can be time-consuming, but it is worth the effort. An effective logging system allows you to focus on monitoring your key business metrics, which can increase the reliability of your products and the revenue of your company.
10 helm tutorials to start your Kubernetes-Journey
As Kubernetes has grown in popularity and use, the applications deployed on it have become more complex. Configuring even a single application can now require the creation of many interdependent Kubernetes resources, each of which requires writing a detailed YAML manifest file. In this context, Helm serves as a package manager for Kubernetes, helping users make their Kubernetes configurations more reusable.
Helm for Beginners
Helm is a popular application package manager for Kubernetes that allows you to describe the structure of your application using Helm charts. With the Helm command-line interface, you can roll back deployments, monitor the state of your application, and track the history of each deployment. Helm has transformed the way server-side applications are defined, stored, and managed. In April 2019, the Cloud Native Computing Foundation (CNCF) graduated Helm from incubation to become a full project, which means it will have access to more resources going forward.
Some of the main features of Helm include:
- Finding and using popular Kubernetes software packaged as Helm charts
- Sharing Kubernetes applications as Helm charts
- Creating reproducible builds of your Kubernetes applications
- Managing Kubernetes manifest files
- Managing Helm package releases
Why Helm Charts?
Helm configuration files, known as charts, consist of a few YAML files that contain metadata and templates that are rendered into Kubernetes manifest files. The basic directory structure of a chart includes:
package-name/
  charts/
  templates/
  Chart.yaml
  LICENSE
  README.md
  requirements.yaml
  values.yaml
You can use the Helm command to install a chart from a local directory or from a .tar.gz package that contains the chart’s directory structure. These packaged charts can also be downloaded and installed automatically from chart repositories.
Become a Helm Champion
There are many resources available to help you learn how to use Helm to deploy your Kubernetes applications, including video tutorials that cover a range of topics from basic concepts to advanced practices. Some of these resources may be particularly helpful for beginners who are just starting to learn about Helm and how it works. Here are a few video tutorials that you might find helpful:
1) What is Helm?
David Okun from IBM cloud has created a handy video tutorial introducing Helm, the leading tool for streamlining application and services deployment in Kubernetes. This comprehensive guide covers how to define and manage your applications quickly with Helm.
2) An Introduction to Helm
The CNCF provides an informative video exploring the fundamentals of Helm and its associated charts. Along with detailing how to build, share and use these components, they also present innovative ways to get creative when employing them in your projects.
3) What is Helm in Kubernetes?
Techworld’s video provides the essential information on Helm, its templating engines and potential drawbacks.
4) Helm and Kubernetes Introduction
Matthew Palmer reveals how Node.js, Ruby and PHP programmers can become proficient in Helm for running Kubernetes workloads. In this video, he provides an extensive overview of the architecture behind using charts and releases as well a tutorial on creating Helm Charts from existing web applications written with Node.js & MongoDB.
5) Helm Chart Creation
If you’re just starting out with Helm, Bitnami has got your back. They’ve created a comprehensive yet beginner-friendly tutorial available on Youtube that covers everything from creating your own chart and deploying an example application to adding dependencies and sharing it with others.
6) Helm Chart Patterns
Get the inside scoop on Helm Chart patterns and practices straight from the source! The CNCF has put together an in-depth video tutorial discussing how to review and maintain your public Helm Charts.
7) Building Helm Charts from the Ground Up
Get the ultimate reference guide to creating Helm charts and diving into Kubernetes concepts with this comprehensive video tutorial from CNCF. Delve deeper and get up-to-date knowledge that will take your chart building skills to new heights.
8) Helm Security – A Look Below Deck
Matt Farina has provided an insightful look into the world of Helm security and how Kubernetes users can ensure their applications are well-protected. He showed us what the community is doing to improve processes, creating a safer environment for everyone involved.
9) A Helm 3 Deep-Dive
Join Taylor Thomas of Microsoft Azure and Martin Hickey of IBM for an overview on the changes to Helm v3, brought by the CNCF. Hear their insights into new features like CLI libraries and chart additions, as well as security models that provide greater client protection.
10) Advanced DevOps
Dive into the depths of Helm and gain insight on how to effectively manage Kubernetes-native applications throughout their lifecycles. Explore ways to expand your usage with plugins, add-ons, and more…


It’s Really not that Complicated.
You can actually understand what’s going on inside your live applications.